Vue Complete Course with Javascipt, HTML, CSS, BOOTSTRAP
Vue Complete Course with Javascipt, HTML, CSS, BOOTSTRAP
Genre: eLearning | MP4 | Video: h264, 1280x720 | Audio: AAC, 48.0 KHz
Language: English | Size: 6.52 GB | Duration: 20h 16m
What you'll learn
How to create Web Application with Vue, Vue JS.
Vue, vue js, vuejs, nuxt, vue .js, vue 3, nuxt js, vuex.
What is Vue JS?
Most important Vuejs topics.
How to create multi-page web app with vue-router in vue js.
How to manage the data of our application with the vuex.
How to easily build the largest and most advanced applications using vue and vuex.
Whether you're building a full single-page application or merely add interactivity to your existing app, Vue js has a spectrum of tools to help you.
If you're looking for a JavaScript web framework that isn't going to drown you in complexity, take a look at Vue js.
Vuejs takes what other frameworks have done before, but does it in a way that's fresh and easy-to-use
What are Javascript variables, why are they used
What is Javascript Boolean Logic
How to include JS File in HTML CSS Javascript
What is conditional statements (if else, switch case, ternary operator), how to use in Javascript
How to write Javascript Functions, what are the differences between Function Decleration and Function Expression
What is Javascript loops (for loops, while loops, continue and break statements), how to use them
How to create Javascript Arrays, Array methods (push, pop, shift, unshift ...), Array iteration
How to create Javascript objects, how to update them, object methods
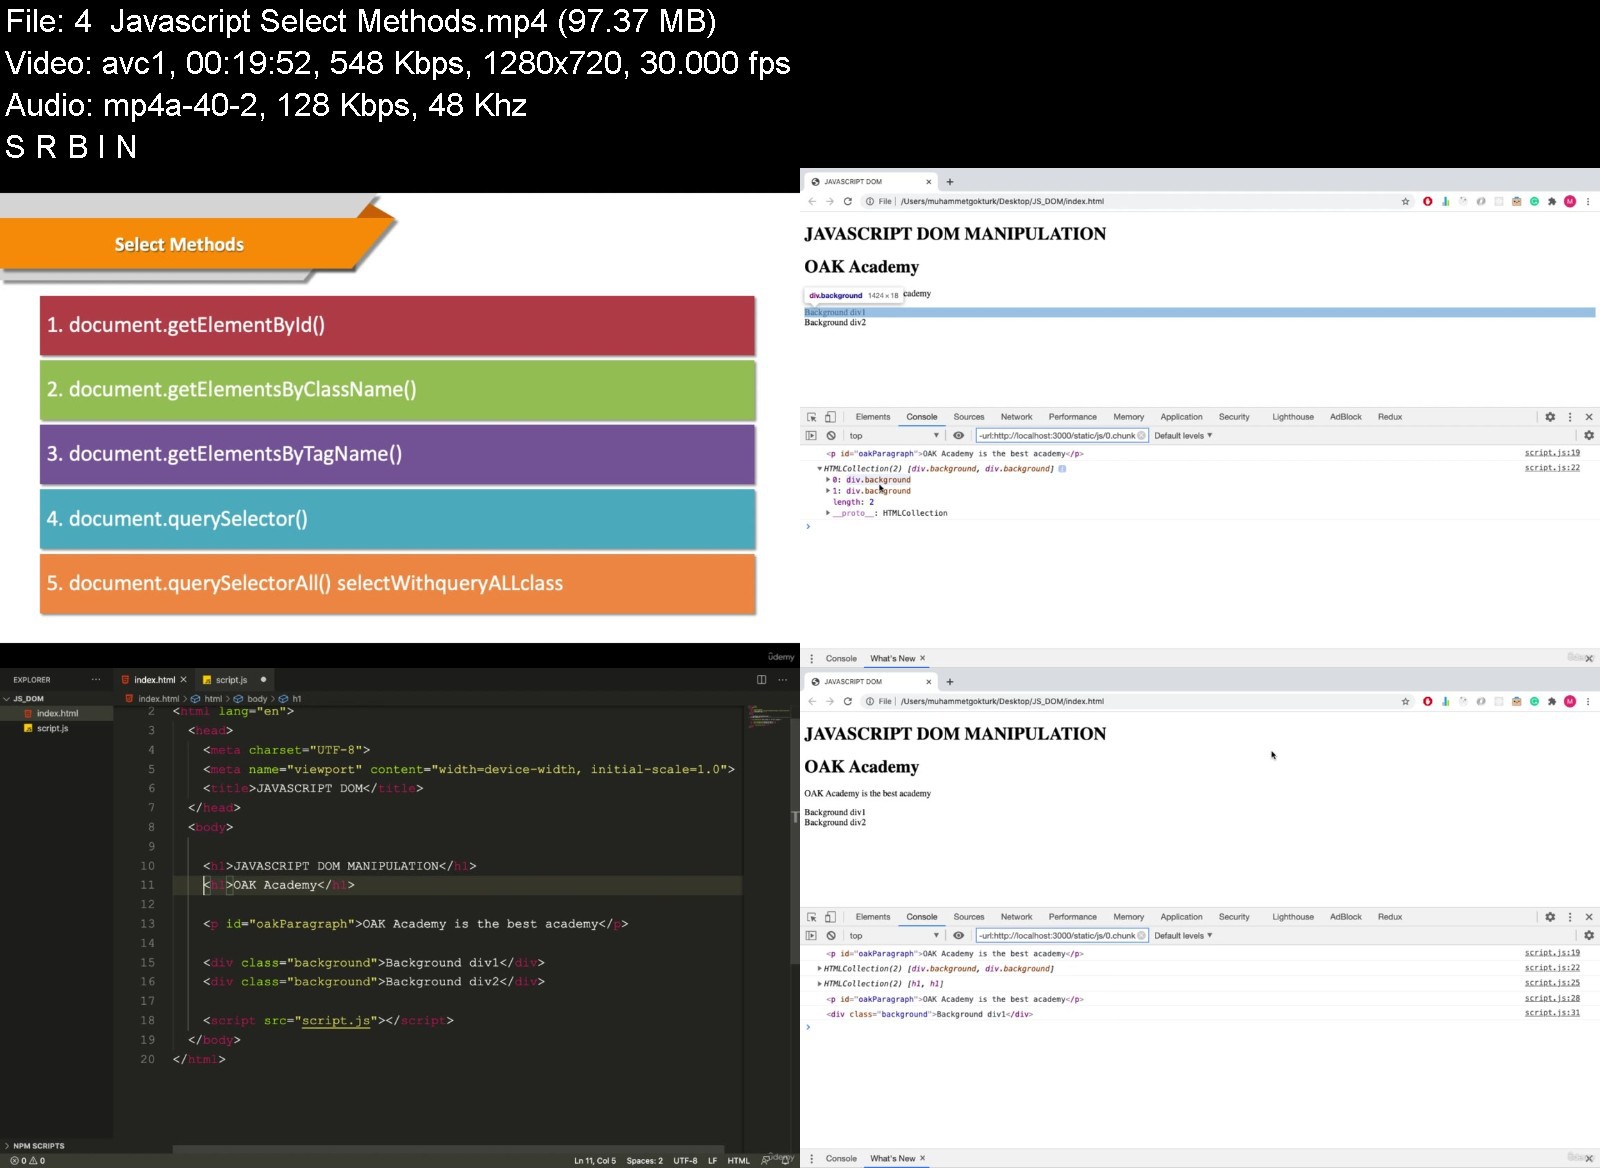
What is DOM, how to manipulate DOM in Javascript
JavaScript is a text-based computer programming language used to make dynamic web pages.
What is JavaScript? JavaScript is a curly-braced, dynamically typed, prototype-based, object-oriented programming language.
JavaScript is the programming language that allows users to interact with the websites that they're visiting, making it a very important language for webdevelop
What are the main uses of JavaScript? JavaScript is a text-based programming language used for client- and server-side development.
React vs. Angular vs. Vue: what is the best JavaScript framework? Choosing the best JavaScript framework for your web project depends on what you are lookingfor
What is JSON and what is it used for? Because of the evolution of the JavaScript language, JavaScript has a variety of techniques for creating objects.
With all of the different JavaScript IDEs available, the best option depends on how you intend to use it, along with your personal preferences.
Learn Bootstrap 4 and UIs from scratch
Learn to use the latest HTML5 and CSS3 to add unique styling to Bootstrap
Learn and create amazing high quality Bootstrap 4 themes and UIs from scratch
Master every single Bootstrap component
Learn to compile Sass in the easiest way possible using a GUI
Get a crash course of the Bootstrap Grid System with the theme layout
Learn how to add Website Scrolling Animation to any Bootstrap Component or HTML Element
HTML & CSS
Learn to create static HTML sites
We will improve our knowledge step by step by learning the basics of CSS
We will learn to place pages in the easiest way by talking about all layout models in CSS
Create a beautiful, responsive landing page for any one
It will be much easier to prepare web pages with Grid CSS and Flexbox features
You will learn to use basic tags which are used commonly
You will be able to prepare lists in different formats
Learn the difference in usage between block level and inline elements in HTML
By learning the use of HTML table, you will be able to create different designs of your own
You will be able to create commonly used user login and registration pages by learning the form structure.
In the developing world, we will talk about all the details about web design compatible with different screens.
As with all of our courses, you will learn by doing too many hands-on examples.
Bootstrap is a free frontend web development framework for creating responsive websites.
Bootstrap promotes a mobile-first approach to web design, offering a suite of templates and components that automatically render for use on any device.
HTML, or hypertext markup language, is computer code used to create web pages and emails. Web developers, email marketers, web writers, and many others use HTML
HTML stands for hyper-text markup language. Whether on a mobile device or a computer, every website that you browse is designed with HTML.
HTML is a formatting language, not a programming language. Javascript is often necessary to make HTML "dynamic."
Learning how to code HTML without also learning CSS is like learning how to read but not write.
What is Cascading Style Sheets (CSS)? CSS or Cascading Style Sheets is a style sheet language used to style markup language.
CSS applies to any career that involves web development. Web designers create the templates, mockups, and styles for a website using HTML and CSS
Requirements
How to easily build the largest and most advanced applications using vue, vue js and vuex.
Desire to learn about vue, vue js, vuejs, nuxt, vue .js, vue 3, nuxt js, vuex.
Desire to learn Javascript and Javascript Projects.
Desire to build web site with html css bootstrap.
This course will take you from scratch to the advanced level.
Watching the lecture videos completely, to the end and in order.
Determination and patience to learn.
Willingness and Motivation to successfully complete the training
Desire to learn Modern Javascipt.
Desire to learn javascript libraries; React, Angular, NodeJS.
Desire to learn Bootstrap 4 and develop bootstrap 4 projects
Desire to learn Javascript Apps
No prior Bootstrap, HTML CSS knowledge needed
You will be learning bootstrap from scratch
Desire to learn HTML, CSS, Bootstrap
Computer with access to the internet
Nothing else! It's just you, your computer and your ambition to get started today.
Description
Vue, vue js, vuejs, nuxt, vue.js, vue 3, nuxt js, veux, javascript, javascript projects, front end web development,
bootstrap, bootstrap 4, bootstrap project, html, css, full stack web development, full stack development, web development,
Hello,
Welcome to the " Vue from Scratch with Real Life Vue JS Web Applications " course.
Vue with basic Vue js applications. Vue.js is a popular frontend JavaScript Framework. Learn vuejs, become vue developer.
Vue (pronounced like view) is a frontend development framework for JavaScript (JS) that you can use to build web-based user interfaces. You can also use vue js to create one-page applications and handle animations, interactive elements, and graphics. Generating projects is also possible with the user-built presets, which is commonly applicable for coders working in enterprise environments. Because vuejs is based on JavaScript, you can easily integrate Vue into an existing JS project.
Whether you're trying to build a full single-page application or merely add a bit of interactivity to your existing app, Vue.js has a spectrum of tools to help you get your job done, and that course can help you get up and running quickly.
If you're looking for a JavaScript web framework that isn't going to drown you in complexity, take a look at Vue.js. Vue.js takes what other frameworks have done before, but does it in a way that's fresh and easy-to-use. Using Vue.js lets you focus your application rather than on your framework.
JavaScript is a very important programming language for internet applications.
Here's how a JavaScript code works, not just how it works. Because in today's JavaScript world, besides writing a code, you need to know how to debug this topic and be able to read every written JavaScript code.
Join more than 12 million learners and train up on JavaScript on Udemy. Choose from a wide range of top-rated JavaScript courses. From back-end development to app or website building, we've got you covered. Our real-world experts can lead you through hands-on projects to apply your skills.
JavaScript is a text-based computer programming language used to make dynamic web pages. A must-learn for aspiring web developers or programmers, JavaScript can be used for features like image carousels, displaying countdowns and timers, and playing media on a webpage. With JavaScript online classes, you can learn to build interactive web applications, choose the best framework, and work with other programming languages like HTML and CSS.
JavaScript is a curly-braced, dynamically typed, prototype-based, object-oriented programming language. It started as the programming language for the web and is one of the three layers of standard web technologies - the other two being HTML and CSS. JavaScript allows you to create and control content dynamically on a web page without requiring a page reload.
Whether you're interested in mastering responsive web design, creating WordPress templates using Bootstrap, or integrating Bootstrap with HTML5, and CSS3, Oak Academy has a top-rated course to help you achieve your goals.
Bootstrap is a free frontend web development framework for creating responsive websites. Bootstrap promotes a mobile-first approach to web design, offering a suite of templates and components that automatically render for use on any device.
HTML, or hypertext markup language, is computer code used to create web pages and emails. Web developers, email marketers, web writers, and many others use HTML. Whether on a mobile device or a computer, every website that you browse is designed with HTML.
HTML isn't a "programming language," but rather a "formatting language." It tells a browser how to display text, images, and other media elements.
Learning how to code HTML without also learning CSS is like learning how to read but not write. All of your hard web development work is lost if you don't optimize it for different screen sizes. Udemy has top-rated courses to show you how CSS helps you do just that.
Consider the devices that you use to access the internet on a daily basis. You'll notice that there isn't a standard screen size. Without CSS, rendering a website's text, layout, and design for these discrepancies in screens would be impossible. CSS is the backbone of all website styling work, and is rightfully considered a cornerstone of internet technology.
CSS or Cascading Style Sheets is a style sheet language used to style markup language. Markup languages include HTML, XHML, XML, and other XML-based languages. The most common use of CSS is to style HTML web pages. Although HTML doesn't need CSS to function, every web page would look the same without it. With CSS, you can target specific elements in a web page and change the look and arrangement on the page. CSS can make an embedded image small or cover the entire webpage as a background. You can enlarge a heading and apply a specific font to stand out from the rest of the page.
In this course you will learn to develop web applications with Vue JS, Vuex from scratch.
If you are thinking to realize your dream web application, this course is for you.
We have explained Vue and Vuex from beginner to all levels. We have explained all the topics as simple as possible with examples, slides, and diagrams.
We have created a lot of projects while explaining the subjects. Because we believe that applied educations are much more useful than other teaching methods.
We explained all the subjects with simple examples and applications, and explanatory diagrams in a way that the student can understand at all levels.
In this tutorial you will learn;
How to create Web Application with Vue JS.
Most important Vue JS topics.
How to create multi-page web app with vue-router.
How to manage the data of our application with the vuex.
How to easily build the largest and most advanced applications using vue and vuex.
How you can operate on variables in javascript,
Boolean logic in javascript,
How to create a conditional statement in javascript,
How you can perform transactions with Loops in javascript,
How a function is created and why it needs arguments in javascript,
How Arrays and Objects, which are basic data structures, are created in javascript,
How DOM Manipulation is done in javascript,
You will have learned and have the opportunity to test what you have learned with the code quizzes in our course.
Learn to use the latest HTML5 and CSS3 to add unique styling to Bootstrap
Learn and create amazing high-quality Bootstrap 4 themes and UIs from scratch
Master every single Bootstrap component
Learn to compile Sass in the easiest way possible using a GUI
Get a crash course of the Bootstrap Grid System with the theme layout
Learn how to add Website Scrolling Animation to any Bootstrap Component or HTML Element
What is Vue JS?
Vue (pronounced like view) is a frontend development framework for JavaScript (JS) that you can use to build web-based user interfaces. You can also use it to create one-page applications and handle animations, interactive elements, and graphics. Generating projects is also possible with the user-built presets, which is commonly applicable for coders working in enterprise environments. Because it is based on JavaScript, you can easily integrate Vue into an existing JS project. Vue uses the traditional Model-View-Controller (MVC) architecture, which means that the core library of Vue.js focuses on the view layer by default. It enforces a one-way data flow between components. This also makes it easy for you to integrate with other libraries or existing projects. Vue also uses virtual DOM (Document Object Model), which makes it faster than regular DOM. Instead of re-rendering the whole page, Vue only updates the objects that you change.
What is the difference between Vue and React?
Although Vue has an MVC architecture, you cannot use it with a different architectural approach, which differs from the Component Based Architecture (CBA) used in React. They also differ in how they optimize data. When a component's state changes in React, it triggers the re-render of the entire component sub-tree, starting at that component as the root. Vue automatically tracks a component's dependencies during its render, so the system knows which components actually need to re-render when the state changes. In React, everything is in JavaScript. Vue, on the other hand, embraces web technologies like HTML, CSS, and JavaScript and allows you to build off of them. Another difference between these frameworks is how you can scale up your projects. React only offers a single template that assumes you're building a single-page application, while Vue offers several default options for multiple purposes and build systems.
Is Vue JS easy to learn?
Vue JS can be easy to learn. Unlike other frontend technologies, Vue doesn't require in-depth knowledge of libraries. If you want to start learning Vue, all you need to have is basic knowledge of HTML, CSS, and JavaScript. Compared to other coding technologies, developers typically classify Vue.js as having an easy learning curve. This is due largely in part to Vue's reputation for having an elegant programming style and patterns. Because Vue is a progressive framework, it makes it easy for you to use it to integrate into an existing project. Because of its familiar templating syntax and use of components, you may find that integrating or migrating existing projects to Vue is fairly straightforward. Vue is known for offering a vast ecosystem of tools and companion libraries, making it a simple framework that you can use to respond to the complex needs of enterprise-grade applications.
What is Vuex used for?
Vuex is a state management pattern + library for Vue. js applications. It serves as a centralized store for all the components in an application, with rules ensuring that the state can only be mutated in a predictable fashion.
What is difference between Vue and Vuex?
Vue is a progressive Javascript framework and Vuex is the state management tool. We can use redux or flux inside Vue, But Vuex is native to the Vue.
Why do I need Vuex?
Vuex is a popular way to handle a complex app's authentication in Vue. With Vuex, you're able to handle the token's availability and access controls and route blocks throughout your app. Mutations, getters, and setters assist with this task.
How does Vuex store work?
It works by having a central store for shared state, and providing methods to allow any component in your application to access that state. In essence, Vuex ensures your views remain consistent with your application data, regardless of which function triggers a change to your application data.
When Should I Use It?
Vuex helps us deal with shared state management with the cost of more concepts and boilerplate. It's a trade-off between short term and long term productivity.
If you've never built a large-scale SPA and jump right into Vuex, it may feel verbose and daunting. That's perfectly normal- if your app is simple, you will most likely be fine without Vuex. A simple store pattern (opens new window)may be all you need. But if you are building a medium-to-large-scale SPA, chances are you have run into situations that make you think about how to better handle state outside of your Vue components, and Vuex will be the natural next step for you.
What is JavaScript?
JavaScript is a curly-braced, dynamically typed, prototype-based, object-oriented programming language. It started as the programming language for the web and is one of the three layers of standard web technologies - the other two being HTML and CSS. JavaScript allows you to create and control content dynamically on a web page without requiring a page reload. Web browsers are able to interpret it, and when triggered by events, modify the HTML and CSS of a web page with dynamic updates. JavaScript also uses asynchronous calls to fetch data from web services in the background. Although it was initially only used in web browsers, JavaScript engines have since been put to use as servers with Node.js, included in desktop application frameworks like Electron, and embedded in phone frameworks like Apache Cordova.
Why is JavaScript important?
JavaScript is the programming language that allows users to interact with the websites that they're visiting, making it a very important language for web developers to know. In the past, most developers focused on the backend; JavaScript was only relevant when they needed to use visual effects. As web development evolved and the focus shifted towards user experience, programmers started to rely on JavaScript for their frontend code heavily. Today, most sites use JavaScript to fetch and submit data, use logic, and generate HTML in browsers. JavaScript can also communicate asynchronously with data servers in the background without interrupting the user interaction in the foreground. These features make JavaScript not only an important language but a necessary language for modern web development.
What are the main uses of JavaScript?
JavaScript is a text-based programming language used for client- and server-side development. Web developers have used JavaScript since its inception to add simple interactivity to web pages like modals, animated elements, or image slideshows. While that is still one of its primary uses, Javascript has evolved to building complete web applications. SPAs, or single page applications, depend on JavaScript-based frameworks like React, Angular, and Vue to bring a desktop-like application experience to the browser. However, it's important to note that web browsers aren't places that make good use of the programming language. Javascript is also popular for building web services and back-end infrastructure with Node.js. React Native, Xamarin, Ionic, and NativeScript frameworks use JavaScript for developing phone apps as well.
React vs. Angular vs. Vue: what is the best JavaScript framework?
Choosing the best JavaScript framework for your web project depends on what you are looking for. React is a popular framework, which means you will find a lot of community support if you need help. It is also considered relatively easy to learn but is being developed at a rapid pace. Angular is a framework that makes data binding easy so that you can template an application faster. It also uses the RxJS library to simplify asynchronous programming and Typescript (which compiles to JavaScript) for a cleaner, less error-prone development process. Some cons of Angular are that it can have a steep learning curve and can be complex. Vue is a lightweight framework, so it is easy to learn, very performant, and flexible. Some cons of Vue are limited plugins, and its flexibility can lead to irregular code.
What is JSON and what is it used for?
Because of the evolution of the JavaScript language, JavaScript has a variety of techniques for creating objects. But, ultimately in the background, JavaScript is using a syntax called JSON. JSON stands for JavaScript Object Notation and is a standard text-based format used to represent objects in JavaScript. The same basic types of data represented in Javascript can also be represented in JSON, including strings, numbers, arrays, booleans, and JavaScript objects. Although JSON is based on the JavaScript object, it is not just used in JavaScript. It is also used as a format to transfer data from a web browser to a server and vice versa because of the format's simplicity and small size. The JSON format is used in REST APIs for this purpose and has replaced XML as the standard format for many APIs. Because of this, just about any language you use will have a method of converting data into JSON to interact with REST APIs.
What is AJAX and what is it used for?
AJAX stands for Asynchronous JavaScript and XML. AJAX is a technology that developers use to create better, faster and more interactive web applications. AJAX uses XHTML for content, CSS to style the page, and JavaScript for controlling content dynamically. AJAX allows you to update a web page without reloading the page (this technique is called a "SPA" or Single Page Application), request data for the page after it has loaded, receive data after the page has loaded, and send data to the server in the background. Despite XML being part of the acronym that makes up AJAX, AJAX can send and receive data in any format, including JSON or plain text. While traditional web applications use synchronous methods to send and receive information from a web server, AJAX can use asynchronous API calls in the background without blocking activity in the browser. AJAX is a data-driven rather than a page-driven technology.
How can I teach myself Javascript?
One of the best ways to learn to write code is through an online course that teaches you how to write JavaScript with an instructor that will explain the code, what versions you should use, and why. Learning to develop a real-world application, with an instructor explaining in a step-by-step fashion, will teach you modern code techniques.
What is the best IDE for Javascript?
With all of the different JavaScript IDEs available, the best option depends on how you intend to use it, along with your personal preferences. Webstorm is a popular JavaScript IDE from JetBrains. It provides fast static code analysis, integrated testing, local history, code refactoring, and debugging. While the IDE requires a paid subscription, many developers swear by it because of its compatibility with JavaScript, HTML, and CSS. Those searching for a free option might prefer VS Code. This general-purpose, open-source IDE comes with IntelliSense, Git integration, and debugging features built-in. Many third-party extensions are available to add new language and programming features, making it one of the more flexible choices. Atom is another general-purpose IDE that is popular with JavaScript developers. It is also free, open-source, and has third-party extensions to add functionality.
What is HTML and why is it important?
HTML stands for a hyper-text markup language. Whether on a mobile device or a computer, every website that you browse is designed with HTML. HTML isn't a "programming language," but rather a "formatting language." It tells a browser how to display text, images, and other media elements. When HTML was first developed, it was fairly simple. For example, the text on a page could be bolded, italicized, or underlined, and images could be resized and aligned. Today, HTML is much more complex and dynamic, allowing front-end developers to create any layout or setup they desire.
Why is CSS and Javascript important for HTML?
HTML is a formatting language, not a programming language. Javascript is often necessary to make HTML "dynamic." While HTML can make it so that text is displayed on the screen, Javascript can update this text or make it move. Javascript is used for both front-end and back-end development, hand-in-hand with HTML, to create complex and attractive web designs. Meanwhile, CSS (Cascading Style Sheets) are used to organize the look and feel of a website and make the website easier to update and manipulate. Today, HTML, CSS, and Javascript are frequently used to develop responsive web designs - designs that react to a user's environment for a better user experience.
What is an HTML element and why is it important?
HTML is designed on a modular basis, meaning every part of the web page has a specific "place." An HTML element is a part of the page. Common HTML elements include "<p>" for a "paragraph" and "<title>" for the "title" of the page. In fact, the entirety of the HTML page is within the "<html>" element. Elements are begun and ended with tags, so a title would be written: "<title>This is the Title to the page.</title>" Organizing code this way makes it easier to reference and control. Each element may also have characteristics. For instance, the "<p>" (paragraph) tag can be aligned in a certain direction. These are the basic building blocks of HTML and what most designers should learn first.
Is HTML a programming language?
HTML is not considered a programming language but rather a markup or formatting language. This is an important distinction. Formatting languages merely control how things are displayed on a visual level, whereas programming languages are more dynamic; they use logic gates to determine the behavior of a program. But there is some crossover. "DHTML," for instance, refers to Dynamic HTML. It is a type of HTML augmented by Javascript to make it easier to adjust on the fly. Because HTML, Javascript, and CSS are so frequently used together, they can often be folded together, which can contribute to some confusion regarding whether HTML is a programming language.
Is HTML hard to learn?
HTML is known as one of the easiest languages to learn. It's also one of the most ubiquitous. Many individuals interested in front-end, back-end, or full-stack development will learn HTML first. While HTML is largely intended for websites as a language, it is also used in many other programs. For example, when you create an email signature, you will usually be using HTML. Emails themselves use a combination of HTML and CSS. An advantage (and an occasional double-edged sword) to HTML is that it is very forgiving. You can get some HTML wrong, and your page will still be displayed, if not exactly how you want it to be.
What jobs use HTML?
Nearly any development or design job will require a cursory understanding of HTML. HTML has also evolved dramatically since it was originally developed; it is far more complex and standardized than before. Because of this, even those who have been experts in HTML during their career may need to undergo an HTML refresher periodically. Most jobs that require HTML will involve web design, web development, or layout and design. For example, someone who manages a content management system such as WordPress may not need to know any other programming languages but should still know HTML basics. Similarly, someone who formats online newsletters or an online magazine in an administrative capacity may not need to be a web designer or web developer but might need to understand the principles of HTML.
What is responsive design?
Responsive design is a new type of design intended to respond to the platform and environment that a user is on. When HTML was created, most people used PCs. Today, people can browse a website on a PC, phone, tablet, or even a game console. In the past, developers created separate sites for "desktop" and "mobile." While it worked, it wasn't easy to maintain. Rather than creating separate sites, responsive design generates the site based on the environment it detects. This greatly reduces the amount of development and maintenance for the site. Responsive design is generally achieved with a combination of HTML, CSS, and Javascript.
What is Cascading Style Sheets (CSS)?
CSS or Cascading Style Sheets is a style sheet language used to style markup language. Markup languages include HTML, XHML, XML, and other XML-based languages. The most common use of CSS is to style HTML web pages. Although HTML doesn't need CSS to function, every web page would look the same without it. With CSS, you can target specific elements in a web page and change the look and arrangement on the page. CSS can make an embedded image small or cover the entire webpage as a background. You can enlarge a heading and apply a specific font to stand out from the rest of the page. Other things you can do with CSS include changing the color of elements, making elements float to one side of the page, and the list goes on. Every web page uses HTML, and every web page that has its unique look uses CSS.
What careers use CSS?
CSS applies to any career that involves web development. Web designers create the templates, mockups, and styles for a website using HTML and CSS that web developers use to build websites. Front-end web developers use CSS with HTML and JavaScript to build front-end web applications that run in the browser. Fullstack web developers create both the part of a web application that runs in the browser and on the server and need to know CSS to make the front-end look good. Content managers may need to know CSS to apply custom styles to articles they publish through a content management system like WordPress. Other job titles that may require you to know CSS include junior web developer, social media manager, website editor, content editor, website project manager, website support specialist, and webmaster.
What skills should I have before learning CSS?
Before learning CSS, you should know the basics of using a computer and how to use a text editor because that is where you will be writing CSS. You should also be familiar with web browsers for browsing the web because it will inform your use of CSS. Since you may end up using specialized tools to write CSS, you should know how to install software on your computer and create and manage files and folders on your computer so you can create a CSS project. Once you have those skills down, the next thing to learn is HTML; after all, CSS is nothing without an HTML page to apply styles. That should be the basics you need to know to get started with CSS.
Fresh Content
It's no secret how technology is advancing at a rapid rate. New tools are released every day, Vue updates its system, and it's crucial to stay on top of the latest knowledge. With this course, you will always have a chance to follow the latest trends.
Video and Audio Production Quality
All our content is created/produced as high-quality video/audio to provide you with the best learning experience.
You will be,
· Seeing clearly
· Hearing clearly
· Moving through the course without distractions
You'll also get
Lifetime Access to The Cours
Fast & Friendly Support in the Q&A section
Udemy Certificate of Completion Ready for Download
Dive in now into;
" Vue Complete Course with Javascipt, HTML, CSS, BOOTSTRAP
Vue Js and Javascript with real Vuejs projects. Learn Vue.js with JS and Frontend Web Development | HTML, CSS, BOOTSTRAP. "
We offer full support, answering any questions.
See you on the other side!
Who this course is for
Who wants to learn Vue with Vue js applications from scratch.
Who wants to learn Vue, vue js, vuejs, nuxt, vue .js, vue 3, nuxt js, vuex.
Who wants to learn how to create websites with Vue
Anyone who trying to learn JavaScript but: 1) still don't really understand JavaScript, or 2) still don't feel confident to code real apps
Who wants to learn today's most popular front-end architectures and take their Web development skills to the next level and learn a future-oriented technology.
Take this course if you want to gain a true and deep understanding of JavaScript
If you're interested in using a library/framework like React, Angular, Vue or Node in the future
Those who want to learn the basics of JavaScript, the world's most popular programming language
If you want to get started with programming: JavaScript is a great first language!
People who want to learn Javascript projects
People who want to learn javascript libraries; react, angular, nodejs
People who want to learn javascript project, react node project, node js projects
If you want to learn HTML 5 and CSS 3, Bootstrap 4 the first step in web development, completely and easily, you are at the right place.
If you want to learn to build beautiful responsive websites with the latest Bootstrap version, Flexbox, HTML5, and CSS3!
People who are willing to make a career in the Web Development
If you want to building your own website, you should enroll
Anyone who want to learn html css bootstrap
Anyone who develop front end web development by using bootstrap
People who want to develop html, css, bootstrap 4 projects
Download from RapidGator
Download from NitroFlare