Mastering Vr Game Development And 3D Asset Modelling
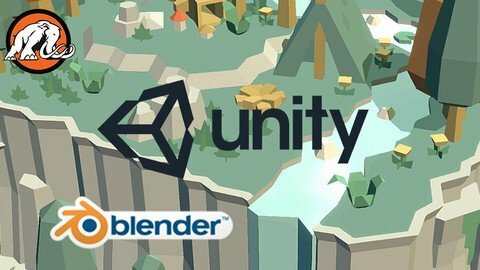
Mastering Vr Game Development And 3D Asset Modelling
Last updated 2/2019
MP4 | Video: h264, 1280x720 | Audio: AAC, 44.1 KHz
Language: English | Size: 83.61 GB | Duration: 106h 31m
Build VR Games and Learn to make Original assets for your projects!
What you'll learn
Build 3D games in Unity®.
Understand the fundamentals of game design.
Code in C#.
Build professional 3D models for video games and more.
Develop with a creative and technical eye.
Design large environments for your character to explore in.
Requirements
Download and install Unity® and Blender.
Videos were recorded in MAC, but it is possible to work with PC.
Description
We at Mammoth Interactive value input from students like you. Feel free to leave us your feedback.Have you ever wanted to make your very own virtual reality games? Well, you've come to the right place!After purchasing this course, you'll be taken step-by-step through every process needed to do just that. Our two very talented instructors, Kevin Liao and Glauco Pires, explain everything from a basic, beginner level. That means, you don't have to have any prior coding or digital art experience to succeed here. In the first section of each tutorial, Glauco Pires will take you through the process of coding the game in Unity® from scratch.The second section of the tutorial will teach you how to create all the artistic elements you will need to complete the game. Kevin Liao will teach this section of the course in Blender; the wonderful, free 3D modeling program.The final section will teach you how to integrate the art you created in Blender to the game in Unity. Glauco will take this part.The beauty of taking an online course like this is the ability to replay any of the lectures at any time. There is no time limit or final tests. You get to learn at your own pace with a practical model method of learning. This course mostly focuses on mobile VRDevelopment. This is because, it is the easiest to develop for and will most widely adopted. "Great course. Definitely learned a lot about how an overall project can come together in Unity. I found the material easy to follow and well constructed. The instructor covers theory and implementation, and it is deep, with real app examples, outstanding.""I like how everything is being explained on a very basic level. Easy to follow, I would imagine, for anyone without any modeling experience. Good job guys, and thanks!"We really hope you decide to purchase this course and take your knowledge to the next level!Let's get started!Enroll now to join the Mammoth community!
Overview
Section 1: Intro to Unity
Lecture 1 Introduction
Lecture 2 Unity Editor
Lecture 3 Moving a Cube
Lecture 4 Materials
Lecture 5 Lights
Lecture 6 Particle System
Lecture 7 Applying Physics
Lecture 8 Asset Store
Section 2: Intro to Coding
Lecture 9 Introduction
Lecture 10 Variables
Lecture 11 Methods
Lecture 12 If Blocks
Lecture 13 Loops
Section 3: Intro to Inputs
Lecture 14 Introduction
Lecture 15 Key Presses
Lecture 16 Moving a Player
Lecture 17 Jumping
Lecture 18 Moving Forward
Lecture 19 Cycling Cameras
Section 4: Intro to Prefabs
Lecture 20 Introduction
Lecture 21 Introduction to Prefabs
Lecture 22 Random Angles
Lecture 23 Explosion Effects
Lecture 24 Adding Explosion Effects
Section 5: Intro to VR
Lecture 25 Introduction
Lecture 26 Activating VR
Lecture 27 Building a Castle
Lecture 28 Lowering the Door
Lecture 29 Triggering
Lecture 30 Interface
Lecture 31 UPDATE - Using the Unity Package with Unity 5.6
Section 6: Whack-a-Mole
Lecture 32 VR Games Preview
Lecture 33 VR SDK
Lecture 34 Whack-a-Mole Intro
Lecture 35 Whack-a-Mole - Part 1
Lecture 36 Whack-a-Mole - Part 2
Lecture 37 Whack-a-Mole - Part 3
Lecture 38 Whack-a-Mole Art - Part 1
Lecture 39 Whack-a-Mole Art - Part 2
Lecture 40 Whack-a-Mole - Part 4
Section 7: Hurdles
Lecture 41 Hurdles Intro
Lecture 42 Hurdles - Part 1
Lecture 43 Hurdles - Part 2
Lecture 44 Hurdles - Part 3
Lecture 45 Hurdles Art
Lecture 46 Hurdles - Part 4
Section 8: Cups and Balls
Lecture 47 Cups And Balls Intro
Lecture 48 Cups And Balls - Part 1
Lecture 49 Cups And Balls - Part 2
Lecture 50 Cups And Balls - Part 3
Lecture 51 Cups And Balls Art
Lecture 52 Cups And Balls - Part 4
Section 9: Bowling
Lecture 53 Bowling - Intro
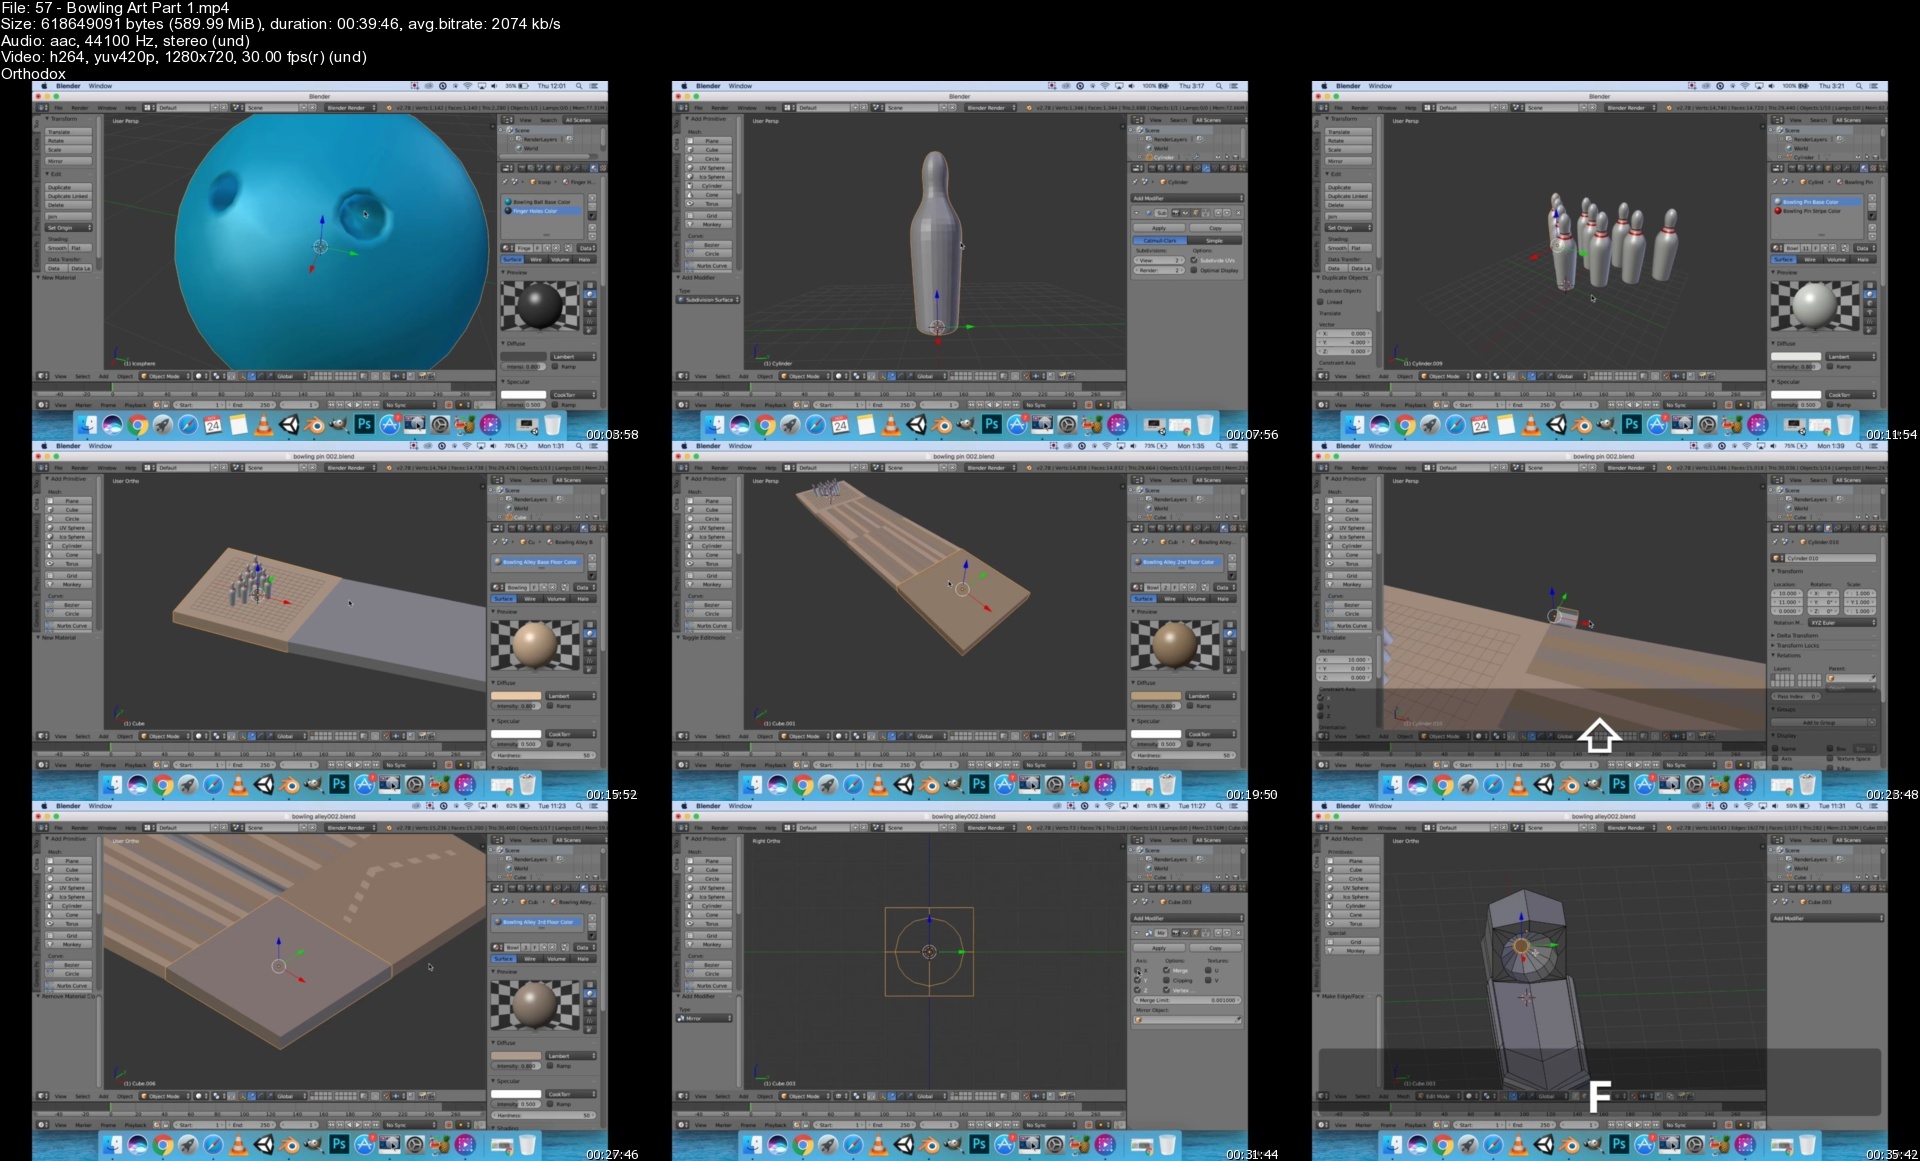
Lecture 54 Bowling - Part 1
Lecture 55 Bowling - Part 2
Lecture 56 Bowling - Part 3
Lecture 57 Bowling (Art) - Part 1
Lecture 58 Bowling (Art) - Part 2
Lecture 59 Bowling - Part 4
Section 10: Ninja Sword
Lecture 60 Ninja Sword - Intro
Lecture 61 Ninja Sword - Part 1
Lecture 62 Ninja Sword - Part 2
Lecture 63 Ninja Sword - Part 3
Lecture 64 Ninja-Sword Art - Part 1
Lecture 65 Ninja Sword Art - Part 2
Lecture 66 Ninja Sword - Part 4
Section 11: Basketball
Lecture 67 Basketball - Intro
Lecture 68 Basketball - Part 1
Lecture 69 Basketball - Part 2
Lecture 70 Basketball - Part 3
Lecture 71 Basketball Art
Lecture 72 Basketball - Part 4
Section 12: Christmas Gifts
Lecture 73 Christmas Gifts - Intro
Lecture 74 Christmas Gifts - Part 1
Lecture 75 Christmas Gifts - Part 2
Lecture 76 Christmas Gifts - Part 3
Lecture 77 Christmas Gifts Art - Part 1
Lecture 78 Christmas Gifts Art - Part 2
Lecture 79 Christmas Gifts - Part 4
Section 13: Spaceship
Lecture 80 Spaceship - Intro
Lecture 81 Spaceship - Part 1
Lecture 82 Spaceship - Part 2
Lecture 83 Spaceship Art - Part 1
Lecture 84 Spaceship Art - Part 2
Lecture 85 Spaceship - Part 3
Section 14: Baseball
Lecture 86 Baseball - Intro
Lecture 87 Baseball - Part 1
Lecture 88 Baseball - Part 2
Lecture 89 Baseball - Part 3
Lecture 90 Baseball Art - Part 1
Lecture 91 Baseball Art - Part 2
Lecture 92 Baseball - Part 4
Section 15: Genius
Lecture 93 Genius - Intro
Lecture 94 Genius - Part 1
Lecture 95 Genius - Part 2
Lecture 96 Genius - Part 3
Lecture 97 Genius Art
Lecture 98 Genius - Part 4
Section 16: Zombie Survival
Lecture 99 Zombie Survival - Intro
Lecture 100 Zombie Survival - Part 1
Lecture 101 Zombie Survival - Part 2
Lecture 102 Zombie Survival - Part 3
Lecture 103 Zombie Survival Art - Part 1
Lecture 104 Zombie Survival Art - Part 2
Lecture 105 Zombie Survival - Part 4
Section 17: Space Shooter
Lecture 106 Space Shooter - Intro
Lecture 107 Space Shooter - Part 1
Lecture 108 Space Shooter - Part 2
Lecture 109 Space Shooter - Part 3
Lecture 110 Space Shooter Art
Lecture 111 Space Shooter - Part 4
Section 18: Clay Shooting
Lecture 112 Clay Shooting - Intro
Lecture 113 Clay Shooting - Part 1
Lecture 114 Clay Shooting - Part 2
Lecture 115 Clay Shooting - Part 3
Lecture 116 Clay Shooting - Part 4
Lecture 117 Clay Shooting Art
Lecture 118 Clay Shooting - Part 5
Section 19: Fruit Ninja
Lecture 119 Fruit Ninja - Intro
Lecture 120 Fruit Ninja - Part 1
Lecture 121 Fruit Ninja - Part 2
Lecture 122 Fruit Ninja - Part 3
Lecture 123 Fruit Ninja Art
Lecture 124 Fruit Ninja - Part 4
Section 20: Flappy Bird
Lecture 125 Flappy Bird - Intro
Lecture 126 Flappy Bird - Part 1
Lecture 127 Flappy Bird - Part 2
Lecture 128 Flappy Bird - Part 3
Lecture 129 Flappy Bird Art
Lecture 130 Flappy Bird - Part 4
Section 21: Pong
Lecture 131 Pong - Intro
Lecture 132 Pong - Part 1
Lecture 133 Pong - Part 2
Lecture 134 Pong - Part 3
Lecture 135 Pong - Part 4
Lecture 136 Pong Art
Section 22: Ghost
Lecture 137 Ghost - Intro
Lecture 138 Ghost - Part 1
Lecture 139 Ghost - Part 2
Lecture 140 Ghost - Part 3
Lecture 141 Ghost Art
Lecture 142 Ghost - Part 4
Section 23: Soccer Shootout
Lecture 143 Soccer Shootout - Intro
Lecture 144 Soccer Shootout - Part 1
Lecture 145 Soccer Shootout - Part 2
Lecture 146 Soccer Shootout - Part 3
Lecture 147 Soccer Shootout Art - Part 1
Lecture 148 Soccer Shootout Art - Part 2
Lecture 149 Soccer Shootout - Part 4
Section 24: Motorcycle
Lecture 150 Motorcycle - Intro
Lecture 151 Motorcycle - Part 1
Lecture 152 Motorcycle - Part 2
Lecture 153 Motorcycle - Part 3
Lecture 154 Motorcycle Art - Part 1
Lecture 155 Motorcycle Art - Part 2
Lecture 156 Motorcycle - Part 4
Section 25: Turret
Lecture 157 Turret - Intro
Lecture 158 Turret - Part 1
Lecture 159 Turret - Part 2
Lecture 160 Turret - Part 3
Lecture 161 Turret - Part 4
Lecture 162 Turret Art - Part 1
Lecture 163 Turret Art - Part 2
Lecture 164 Turret - Part 5
Section 26: Western Shooter
Lecture 165 Western Shooter - Intro
Lecture 166 Western Shooter - Part 1
Lecture 167 Western Shooter - Part 2
Lecture 168 Western Shooter - Part 3
Lecture 169 Western Shooter Art - Part 1
Lecture 170 Western Shooter Art - Part 2
Lecture 171 Western Shooter - Part 4
Section 27: Cannon Ball
Lecture 172 Cannon Ball - Intro
Lecture 173 Cannon Ball - Part 1
Lecture 174 Cannon Ball - Part 2
Lecture 175 Cannon Ball - Part 3
Lecture 176 Cannon Ball Art
Lecture 177 Cannon Ball - Part 4
Section 28: Paraglider
Lecture 178 Paraglider - Intro
Lecture 179 Paraglider - Part 1
Lecture 180 Paraglider - Part 2
Lecture 181 Paraglider - Part 3
Lecture 182 Paraglider Art
Lecture 183 Paraglider - Part 4
Section 29: Train
Lecture 184 Train - Intro
Lecture 185 Train - Part 1
Lecture 186 Train - Part 2
Lecture 187 Train - Part 3
Lecture 188 Train Art
Lecture 189 Train - Part 4
Section 30: First Person Shooter
Lecture 190 First Person Shooter - Intro
Lecture 191 First Person Shooter - Part 1
Lecture 192 First Person Shooter - Part 2
Lecture 193 First Person Shooter - Part 3
Lecture 194 First Person Shooter Art
Lecture 195 First Person Shooter - Part 4
Section 31: Escape the Room
Lecture 196 Escape the Room - Intro
Lecture 197 Escape the Room - Part 1
Lecture 198 Escape the Room - Part 2
Lecture 199 Escape the Room Art
Lecture 200 Escape the Room - Part 3
Section 32: Forest Searcher
Lecture 201 Forest Searcher - Intro
Lecture 202 Forest Searcher - Part 1
Lecture 203 Forest Searcher - Part 2
Lecture 204 Forest Searcher - Part 3
Lecture 205 Forest Searcher Art - Part 1
Lecture 206 Forest Searcher Art - Part 2
Lecture 207 Forest Searcher Art - Part 3
Lecture 208 Forest Searcher - Part 4
Section 33: Kart
Lecture 209 Kart - Intro
Lecture 210 Kart - Part 1
Lecture 211 Kart - Part 2
Lecture 212 Kart - Part 3
Lecture 213 Kart Art
Lecture 214 Kart - Part 4
Section 34: Hide and Seek
Lecture 215 Hide and Seek - Intro
Lecture 216 Hide and Seek - Part 1
Lecture 217 Hide and Seek - Part 2
Lecture 218 Hide and Seek - Part 3
Lecture 219 Hide and Seek Art
Lecture 220 Hide and Seek - Part 4
Section 35: Tic Tac Toe
Lecture 221 Tic Tac Toe - Intro
Lecture 222 Tic Tac Toe - Part 1
Lecture 223 Tic Tac Toe - Part 2
Lecture 224 Tic Tac Toe - Part 3
Lecture 225 Tic Tac Toe Art
Lecture 226 Tic Tac Toe - Part 4
Section 36: VR Games Assets
Lecture 227 VR Games Assets
Section 37: Getting Started with Blender
Lecture 228 Intro and Setting Changes
Lecture 229 Camera Controls
Lecture 230 Emulated Numbpad Camera
Lecture 231 Basic Object Manipulation
Lecture 232 Frequently Used Tools
Lecture 233 Mirror Modifier
Section 38: A Beginners guide to Low-Poly models in Blender
Lecture 234 Low Poly House
Lecture 235 Project Files - House
Lecture 236 Low Poly Large House
Lecture 237 Project Files - Large House
Lecture 238 Low Poly Castle
Lecture 239 Project Files - Castle
Lecture 240 Low Poly Church
Lecture 241 Project Files - Church
Lecture 242 Low Poly Lighthouse
Lecture 243 Project Files - Lighthouse
Lecture 244 Low Poly Longhouse
Lecture 245 Project Files - Longhouse
Lecture 246 Low Poly Store
Lecture 247 Project Files - Store
Lecture 248 Low Poly Office Building
Lecture 249 Project Files - Office Highrise
Lecture 250 Low Poly Eiffel Tower
Lecture 251 Project Files - Eiffel Tower
Lecture 252 Low Poly Greek Temple
Lecture 253 Project Files - Greek Temple
Lecture 254 Low Poly Japanese Pagoda
Lecture 255 Project Files - Japanese Pagoda
Lecture 256 Low Poly Chinese Pagoda
Lecture 257 Project Files - Chinese Pagoda
Lecture 258 Low Poly Taipei
Lecture 259 Project Files - Taipei
Section 39: 3D Model 32 Low Poly Buildings in Blender for Beginners
Lecture 260 Low Poly Tent
Lecture 261 Project Files - Tent
Lecture 262 Low Poly Windmill
Lecture 263 Project Files - Windmill
Lecture 264 Low Poly Modern Windmill
Lecture 265 Project Files - Modern Windmill
Lecture 266 Medieval-Style Low Poly House
Lecture 267 Medieval-Style Low Poly House Continued
Lecture 268 Project Files - Medieval House
Lecture 269 Low Poly Colosseum
Lecture 270 Project Files - Colosseum
Lecture 271 Low Poly CN Tower
Lecture 272 Project Files - CN Tower
Lecture 273 Freestyle Moon Base
Lecture 274 Project Files - Freestyle Moon Base
Lecture 275 Freestyle Space Station
Lecture 276 Project Files - Freestyle Space Station
Lecture 277 Pyramids of Giza
Lecture 278 Project Files - Pyramids of Giza
Lecture 279 Low Poly Leaning Tower of Pisa
Lecture 280 Project Files - Leaning Tower of Pisa
Lecture 281 Arc De Triomphe
Lecture 282 Project Files - Arc De Triomphe
Lecture 283 Mayan Temple
Lecture 284 Project Files - Mayan Temple
Lecture 285 Shinto Shrine Gate
Lecture 286 Project Files - Shinto Shrine Gate
Lecture 287 Low Poly Big Ben
Lecture 288 Project Files - Big Ben
Lecture 289 Great Wall of China
Lecture 290 Project Files - Great Wall of China
Lecture 291 Forbidden City Main Building
Lecture 292 Project Files - Forbidden City Main Building
Lecture 293 Parthenon
Lecture 294 Project Files - Parthenon
Lecture 295 Greek Amphitheatre
Lecture 296 Project Files - Greek Amphitheatre
Lecture 297 Renaissance-Themed Building
Lecture 298 Project Files - Renaissance-Themed Building
Lecture 299 Empire State Building
Lecture 300 Project Files - Empire State Building
Lecture 301 Greek Building
Lecture 302 Project Files - Greek Building
Lecture 303 London Bridge
Lecture 304 Project Files - London Bridge
Lecture 305 White House
Lecture 306 Project Files - White House
Lecture 307 Peace Arch
Lecture 308 Project Files - Peace Arch
Lecture 309 Washington Monument
Lecture 310 Project Files - Washington Monument
Lecture 311 Gateway Arch
Lecture 312 Project Files - Gateway Arch
Lecture 313 Cathedral of Florence
Lecture 314 Project Files - Cathedral of Florence
Lecture 315 Basilica Di San Lorenzo
Lecture 316 Project Files - Basilica Di San Lorenzo
Lecture 317 Basilica Di Santa Croce
Lecture 318 Project Files - Basilica Di Santa Croce
Lecture 319 Palazzo Pitti
Lecture 320 Project Files - Palazzo Pitti
Lecture 321 Saint Peter's Basilica
Lecture 322 Project Files - Saint Peters Basilica
Section 40: 10 Low Poly buildings in Blender
Lecture 323 Lighthouse of Alexandria
Lecture 324 Mausoleum of Halicarnassus
Lecture 325 Temple of Artemis
Lecture 326 Colossus of Rhodes (Part 1)
Lecture 327 Colossus of Rhodes (Part 2)
Lecture 328 Colossus of Rhodes (Part 3)
Lecture 329 Statue of Zeus (Part 1)
Lecture 330 Statue of Zeus (Part 2)
Lecture 331 Statue of Zeus (Part 3)
Lecture 332 Taj Mahal
Lecture 333 Brooklyn Bridge
Lecture 334 Flatiron Building
Lecture 335 Las Vegas Hotel
Lecture 336 Chrysler Building
Lecture 337 Project Files - Mammoth Interactive
Section 41: Modelling 14 Low Poly Buildings for Games!
Lecture 338 Sear Tower
Lecture 339 Golden Gate Bridge
Lecture 340 Project Files - Golden Gate Bridge
Lecture 341 GM Renaissance Center
Lecture 342 Project Files - GM Renaissance Center
Lecture 343 Guggenheim Museum
Lecture 344 Project Files - Guggenheim Museum
Lecture 345 Moai Easter Island Statue
Lecture 346 Project Files - Moai Easter Island Statue
Lecture 347 Stonehenge Aoteara
Lecture 348 Project Files - Stonehenge Aoteara
Lecture 349 Brandenburg Gate
Lecture 350 Project Files - Brandenburg Gate
Lecture 351 Great Sphinx of Giza
Lecture 352 Project Files - Great Sphinx of Giza
Lecture 353 Temple of Philae
Lecture 354 Project Files - Temple of Philae
Lecture 355 Christ the Redeemer
Lecture 356 Project Files - Christ the Redeemer
Lecture 357 Temple of Heaven
Lecture 358 Project Files - Temple of Heaven
Lecture 359 Petronas Twin Towers
Lecture 360 Project Files - Petronas Twin Towers
Lecture 361 Star Shape Fort
Lecture 362 Project Files - Star Shape Fort
Lecture 363 The Royal Ontario Museum
Lecture 364 Project Files - The Royal Ontario Museum
Section 42: Build 3D Models of Trees in Blender
Lecture 365 Tree Assets
Lecture 366 Pine Tree Assets
Lecture 367 Palm Trees Assets
Section 43: Build Desert Models in Blender
Lecture 368 Rock Assets
Lecture 369 Dead Tree Assets
Lecture 370 Cactus Trees
Lecture 371 Island Region
Lecture 372 Mountain Region
Lecture 373 Desert Region and Plateau
Section 44: 3D Modeling in Unity
Lecture 374 Snow Mountain Region
Lecture 375 Unity Mountain Region
Lecture 376 Unity Island Environment
Lecture 377 Unity Snow Mountain Region
Lecture 378 Boombox Asset
Section 45: Source Files - 3D Modeling Environments
Lecture 379 Source Files - 3D Environment Models
Section 46: Low Poly Rock Models for 3D environments
Lecture 380 Low Poly Smooth Stones
Lecture 381 Low Poly Stone Slabs
Lecture 382 Snow on Rocks
Lecture 383 Jagged Rock Slab
Lecture 384 Desert Floor
Lecture 385 Jagged Rocks and Desert Floor
Lecture 386 Blender Source Files
Section 47: Low Poly Sword as weapons
Lecture 387 Claymore
Lecture 388 Dagger
Lecture 389 Greek Sword
Lecture 390 Katana
Lecture 391 Simple Blade
Lecture 392 Source Files
Section 48: Low Poly Trees for Games
Lecture 393 Simple Poly Tree
Lecture 394 Fir Tree
Lecture 395 Christmas Tree with a star
Lecture 396 Willow Tree
Lecture 397 Jungle Tree
Lecture 398 Pine Tree
Lecture 399 Bonsai Tree
Lecture 400 Source Files of Art
Lecture 401 Please rate this course
Lecture 402 Bonus Lecture - Mammoth Interactive Deals
No prior coding skills necessary.,Anyone who wants their start at making 3D or 2D video games.,Beginners who want to learn how to use Blender.,If you want to, you can download the models in the project files and import into Unity.
Homepage
Mastering Vr Game Development And 3D Asset Modelling
Last updated 2/2019
MP4 | Video: h264, 1280x720 | Audio: AAC, 44.1 KHz
Language: English | Size: 83.61 GB | Duration: 106h 31m
Build VR Games and Learn to make Original assets for your projects!
What you'll learn
Build 3D games in Unity®.
Understand the fundamentals of game design.
Code in C#.
Build professional 3D models for video games and more.
Develop with a creative and technical eye.
Design large environments for your character to explore in.
Requirements
Download and install Unity® and Blender.
Videos were recorded in MAC, but it is possible to work with PC.
Description
We at Mammoth Interactive value input from students like you. Feel free to leave us your feedback.Have you ever wanted to make your very own virtual reality games? Well, you've come to the right place!After purchasing this course, you'll be taken step-by-step through every process needed to do just that. Our two very talented instructors, Kevin Liao and Glauco Pires, explain everything from a basic, beginner level. That means, you don't have to have any prior coding or digital art experience to succeed here. In the first section of each tutorial, Glauco Pires will take you through the process of coding the game in Unity® from scratch.The second section of the tutorial will teach you how to create all the artistic elements you will need to complete the game. Kevin Liao will teach this section of the course in Blender; the wonderful, free 3D modeling program.The final section will teach you how to integrate the art you created in Blender to the game in Unity. Glauco will take this part.The beauty of taking an online course like this is the ability to replay any of the lectures at any time. There is no time limit or final tests. You get to learn at your own pace with a practical model method of learning. This course mostly focuses on mobile VRDevelopment. This is because, it is the easiest to develop for and will most widely adopted. "Great course. Definitely learned a lot about how an overall project can come together in Unity. I found the material easy to follow and well constructed. The instructor covers theory and implementation, and it is deep, with real app examples, outstanding.""I like how everything is being explained on a very basic level. Easy to follow, I would imagine, for anyone without any modeling experience. Good job guys, and thanks!"We really hope you decide to purchase this course and take your knowledge to the next level!Let's get started!Enroll now to join the Mammoth community!
Overview
Section 1: Intro to Unity
Lecture 1 Introduction
Lecture 2 Unity Editor
Lecture 3 Moving a Cube
Lecture 4 Materials
Lecture 5 Lights
Lecture 6 Particle System
Lecture 7 Applying Physics
Lecture 8 Asset Store
Section 2: Intro to Coding
Lecture 9 Introduction
Lecture 10 Variables
Lecture 11 Methods
Lecture 12 If Blocks
Lecture 13 Loops
Section 3: Intro to Inputs
Lecture 14 Introduction
Lecture 15 Key Presses
Lecture 16 Moving a Player
Lecture 17 Jumping
Lecture 18 Moving Forward
Lecture 19 Cycling Cameras
Section 4: Intro to Prefabs
Lecture 20 Introduction
Lecture 21 Introduction to Prefabs
Lecture 22 Random Angles
Lecture 23 Explosion Effects
Lecture 24 Adding Explosion Effects
Section 5: Intro to VR
Lecture 25 Introduction
Lecture 26 Activating VR
Lecture 27 Building a Castle
Lecture 28 Lowering the Door
Lecture 29 Triggering
Lecture 30 Interface
Lecture 31 UPDATE - Using the Unity Package with Unity 5.6
Section 6: Whack-a-Mole
Lecture 32 VR Games Preview
Lecture 33 VR SDK
Lecture 34 Whack-a-Mole Intro
Lecture 35 Whack-a-Mole - Part 1
Lecture 36 Whack-a-Mole - Part 2
Lecture 37 Whack-a-Mole - Part 3
Lecture 38 Whack-a-Mole Art - Part 1
Lecture 39 Whack-a-Mole Art - Part 2
Lecture 40 Whack-a-Mole - Part 4
Section 7: Hurdles
Lecture 41 Hurdles Intro
Lecture 42 Hurdles - Part 1
Lecture 43 Hurdles - Part 2
Lecture 44 Hurdles - Part 3
Lecture 45 Hurdles Art
Lecture 46 Hurdles - Part 4
Section 8: Cups and Balls
Lecture 47 Cups And Balls Intro
Lecture 48 Cups And Balls - Part 1
Lecture 49 Cups And Balls - Part 2
Lecture 50 Cups And Balls - Part 3
Lecture 51 Cups And Balls Art
Lecture 52 Cups And Balls - Part 4
Section 9: Bowling
Lecture 53 Bowling - Intro
Lecture 54 Bowling - Part 1
Lecture 55 Bowling - Part 2
Lecture 56 Bowling - Part 3
Lecture 57 Bowling (Art) - Part 1
Lecture 58 Bowling (Art) - Part 2
Lecture 59 Bowling - Part 4
Section 10: Ninja Sword
Lecture 60 Ninja Sword - Intro
Lecture 61 Ninja Sword - Part 1
Lecture 62 Ninja Sword - Part 2
Lecture 63 Ninja Sword - Part 3
Lecture 64 Ninja-Sword Art - Part 1
Lecture 65 Ninja Sword Art - Part 2
Lecture 66 Ninja Sword - Part 4
Section 11: Basketball
Lecture 67 Basketball - Intro
Lecture 68 Basketball - Part 1
Lecture 69 Basketball - Part 2
Lecture 70 Basketball - Part 3
Lecture 71 Basketball Art
Lecture 72 Basketball - Part 4
Section 12: Christmas Gifts
Lecture 73 Christmas Gifts - Intro
Lecture 74 Christmas Gifts - Part 1
Lecture 75 Christmas Gifts - Part 2
Lecture 76 Christmas Gifts - Part 3
Lecture 77 Christmas Gifts Art - Part 1
Lecture 78 Christmas Gifts Art - Part 2
Lecture 79 Christmas Gifts - Part 4
Section 13: Spaceship
Lecture 80 Spaceship - Intro
Lecture 81 Spaceship - Part 1
Lecture 82 Spaceship - Part 2
Lecture 83 Spaceship Art - Part 1
Lecture 84 Spaceship Art - Part 2
Lecture 85 Spaceship - Part 3
Section 14: Baseball
Lecture 86 Baseball - Intro
Lecture 87 Baseball - Part 1
Lecture 88 Baseball - Part 2
Lecture 89 Baseball - Part 3
Lecture 90 Baseball Art - Part 1
Lecture 91 Baseball Art - Part 2
Lecture 92 Baseball - Part 4
Section 15: Genius
Lecture 93 Genius - Intro
Lecture 94 Genius - Part 1
Lecture 95 Genius - Part 2
Lecture 96 Genius - Part 3
Lecture 97 Genius Art
Lecture 98 Genius - Part 4
Section 16: Zombie Survival
Lecture 99 Zombie Survival - Intro
Lecture 100 Zombie Survival - Part 1
Lecture 101 Zombie Survival - Part 2
Lecture 102 Zombie Survival - Part 3
Lecture 103 Zombie Survival Art - Part 1
Lecture 104 Zombie Survival Art - Part 2
Lecture 105 Zombie Survival - Part 4
Section 17: Space Shooter
Lecture 106 Space Shooter - Intro
Lecture 107 Space Shooter - Part 1
Lecture 108 Space Shooter - Part 2
Lecture 109 Space Shooter - Part 3
Lecture 110 Space Shooter Art
Lecture 111 Space Shooter - Part 4
Section 18: Clay Shooting
Lecture 112 Clay Shooting - Intro
Lecture 113 Clay Shooting - Part 1
Lecture 114 Clay Shooting - Part 2
Lecture 115 Clay Shooting - Part 3
Lecture 116 Clay Shooting - Part 4
Lecture 117 Clay Shooting Art
Lecture 118 Clay Shooting - Part 5
Section 19: Fruit Ninja
Lecture 119 Fruit Ninja - Intro
Lecture 120 Fruit Ninja - Part 1
Lecture 121 Fruit Ninja - Part 2
Lecture 122 Fruit Ninja - Part 3
Lecture 123 Fruit Ninja Art
Lecture 124 Fruit Ninja - Part 4
Section 20: Flappy Bird
Lecture 125 Flappy Bird - Intro
Lecture 126 Flappy Bird - Part 1
Lecture 127 Flappy Bird - Part 2
Lecture 128 Flappy Bird - Part 3
Lecture 129 Flappy Bird Art
Lecture 130 Flappy Bird - Part 4
Section 21: Pong
Lecture 131 Pong - Intro
Lecture 132 Pong - Part 1
Lecture 133 Pong - Part 2
Lecture 134 Pong - Part 3
Lecture 135 Pong - Part 4
Lecture 136 Pong Art
Section 22: Ghost
Lecture 137 Ghost - Intro
Lecture 138 Ghost - Part 1
Lecture 139 Ghost - Part 2
Lecture 140 Ghost - Part 3
Lecture 141 Ghost Art
Lecture 142 Ghost - Part 4
Section 23: Soccer Shootout
Lecture 143 Soccer Shootout - Intro
Lecture 144 Soccer Shootout - Part 1
Lecture 145 Soccer Shootout - Part 2
Lecture 146 Soccer Shootout - Part 3
Lecture 147 Soccer Shootout Art - Part 1
Lecture 148 Soccer Shootout Art - Part 2
Lecture 149 Soccer Shootout - Part 4
Section 24: Motorcycle
Lecture 150 Motorcycle - Intro
Lecture 151 Motorcycle - Part 1
Lecture 152 Motorcycle - Part 2
Lecture 153 Motorcycle - Part 3
Lecture 154 Motorcycle Art - Part 1
Lecture 155 Motorcycle Art - Part 2
Lecture 156 Motorcycle - Part 4
Section 25: Turret
Lecture 157 Turret - Intro
Lecture 158 Turret - Part 1
Lecture 159 Turret - Part 2
Lecture 160 Turret - Part 3
Lecture 161 Turret - Part 4
Lecture 162 Turret Art - Part 1
Lecture 163 Turret Art - Part 2
Lecture 164 Turret - Part 5
Section 26: Western Shooter
Lecture 165 Western Shooter - Intro
Lecture 166 Western Shooter - Part 1
Lecture 167 Western Shooter - Part 2
Lecture 168 Western Shooter - Part 3
Lecture 169 Western Shooter Art - Part 1
Lecture 170 Western Shooter Art - Part 2
Lecture 171 Western Shooter - Part 4
Section 27: Cannon Ball
Lecture 172 Cannon Ball - Intro
Lecture 173 Cannon Ball - Part 1
Lecture 174 Cannon Ball - Part 2
Lecture 175 Cannon Ball - Part 3
Lecture 176 Cannon Ball Art
Lecture 177 Cannon Ball - Part 4
Section 28: Paraglider
Lecture 178 Paraglider - Intro
Lecture 179 Paraglider - Part 1
Lecture 180 Paraglider - Part 2
Lecture 181 Paraglider - Part 3
Lecture 182 Paraglider Art
Lecture 183 Paraglider - Part 4
Section 29: Train
Lecture 184 Train - Intro
Lecture 185 Train - Part 1
Lecture 186 Train - Part 2
Lecture 187 Train - Part 3
Lecture 188 Train Art
Lecture 189 Train - Part 4
Section 30: First Person Shooter
Lecture 190 First Person Shooter - Intro
Lecture 191 First Person Shooter - Part 1
Lecture 192 First Person Shooter - Part 2
Lecture 193 First Person Shooter - Part 3
Lecture 194 First Person Shooter Art
Lecture 195 First Person Shooter - Part 4
Section 31: Escape the Room
Lecture 196 Escape the Room - Intro
Lecture 197 Escape the Room - Part 1
Lecture 198 Escape the Room - Part 2
Lecture 199 Escape the Room Art
Lecture 200 Escape the Room - Part 3
Section 32: Forest Searcher
Lecture 201 Forest Searcher - Intro
Lecture 202 Forest Searcher - Part 1
Lecture 203 Forest Searcher - Part 2
Lecture 204 Forest Searcher - Part 3
Lecture 205 Forest Searcher Art - Part 1
Lecture 206 Forest Searcher Art - Part 2
Lecture 207 Forest Searcher Art - Part 3
Lecture 208 Forest Searcher - Part 4
Section 33: Kart
Lecture 209 Kart - Intro
Lecture 210 Kart - Part 1
Lecture 211 Kart - Part 2
Lecture 212 Kart - Part 3
Lecture 213 Kart Art
Lecture 214 Kart - Part 4
Section 34: Hide and Seek
Lecture 215 Hide and Seek - Intro
Lecture 216 Hide and Seek - Part 1
Lecture 217 Hide and Seek - Part 2
Lecture 218 Hide and Seek - Part 3
Lecture 219 Hide and Seek Art
Lecture 220 Hide and Seek - Part 4
Section 35: Tic Tac Toe
Lecture 221 Tic Tac Toe - Intro
Lecture 222 Tic Tac Toe - Part 1
Lecture 223 Tic Tac Toe - Part 2
Lecture 224 Tic Tac Toe - Part 3
Lecture 225 Tic Tac Toe Art
Lecture 226 Tic Tac Toe - Part 4
Section 36: VR Games Assets
Lecture 227 VR Games Assets
Section 37: Getting Started with Blender
Lecture 228 Intro and Setting Changes
Lecture 229 Camera Controls
Lecture 230 Emulated Numbpad Camera
Lecture 231 Basic Object Manipulation
Lecture 232 Frequently Used Tools
Lecture 233 Mirror Modifier
Section 38: A Beginners guide to Low-Poly models in Blender
Lecture 234 Low Poly House
Lecture 235 Project Files - House
Lecture 236 Low Poly Large House
Lecture 237 Project Files - Large House
Lecture 238 Low Poly Castle
Lecture 239 Project Files - Castle
Lecture 240 Low Poly Church
Lecture 241 Project Files - Church
Lecture 242 Low Poly Lighthouse
Lecture 243 Project Files - Lighthouse
Lecture 244 Low Poly Longhouse
Lecture 245 Project Files - Longhouse
Lecture 246 Low Poly Store
Lecture 247 Project Files - Store
Lecture 248 Low Poly Office Building
Lecture 249 Project Files - Office Highrise
Lecture 250 Low Poly Eiffel Tower
Lecture 251 Project Files - Eiffel Tower
Lecture 252 Low Poly Greek Temple
Lecture 253 Project Files - Greek Temple
Lecture 254 Low Poly Japanese Pagoda
Lecture 255 Project Files - Japanese Pagoda
Lecture 256 Low Poly Chinese Pagoda
Lecture 257 Project Files - Chinese Pagoda
Lecture 258 Low Poly Taipei
Lecture 259 Project Files - Taipei
Section 39: 3D Model 32 Low Poly Buildings in Blender for Beginners
Lecture 260 Low Poly Tent
Lecture 261 Project Files - Tent
Lecture 262 Low Poly Windmill
Lecture 263 Project Files - Windmill
Lecture 264 Low Poly Modern Windmill
Lecture 265 Project Files - Modern Windmill
Lecture 266 Medieval-Style Low Poly House
Lecture 267 Medieval-Style Low Poly House Continued
Lecture 268 Project Files - Medieval House
Lecture 269 Low Poly Colosseum
Lecture 270 Project Files - Colosseum
Lecture 271 Low Poly CN Tower
Lecture 272 Project Files - CN Tower
Lecture 273 Freestyle Moon Base
Lecture 274 Project Files - Freestyle Moon Base
Lecture 275 Freestyle Space Station
Lecture 276 Project Files - Freestyle Space Station
Lecture 277 Pyramids of Giza
Lecture 278 Project Files - Pyramids of Giza
Lecture 279 Low Poly Leaning Tower of Pisa
Lecture 280 Project Files - Leaning Tower of Pisa
Lecture 281 Arc De Triomphe
Lecture 282 Project Files - Arc De Triomphe
Lecture 283 Mayan Temple
Lecture 284 Project Files - Mayan Temple
Lecture 285 Shinto Shrine Gate
Lecture 286 Project Files - Shinto Shrine Gate
Lecture 287 Low Poly Big Ben
Lecture 288 Project Files - Big Ben
Lecture 289 Great Wall of China
Lecture 290 Project Files - Great Wall of China
Lecture 291 Forbidden City Main Building
Lecture 292 Project Files - Forbidden City Main Building
Lecture 293 Parthenon
Lecture 294 Project Files - Parthenon
Lecture 295 Greek Amphitheatre
Lecture 296 Project Files - Greek Amphitheatre
Lecture 297 Renaissance-Themed Building
Lecture 298 Project Files - Renaissance-Themed Building
Lecture 299 Empire State Building
Lecture 300 Project Files - Empire State Building
Lecture 301 Greek Building
Lecture 302 Project Files - Greek Building
Lecture 303 London Bridge
Lecture 304 Project Files - London Bridge
Lecture 305 White House
Lecture 306 Project Files - White House
Lecture 307 Peace Arch
Lecture 308 Project Files - Peace Arch
Lecture 309 Washington Monument
Lecture 310 Project Files - Washington Monument
Lecture 311 Gateway Arch
Lecture 312 Project Files - Gateway Arch
Lecture 313 Cathedral of Florence
Lecture 314 Project Files - Cathedral of Florence
Lecture 315 Basilica Di San Lorenzo
Lecture 316 Project Files - Basilica Di San Lorenzo
Lecture 317 Basilica Di Santa Croce
Lecture 318 Project Files - Basilica Di Santa Croce
Lecture 319 Palazzo Pitti
Lecture 320 Project Files - Palazzo Pitti
Lecture 321 Saint Peter's Basilica
Lecture 322 Project Files - Saint Peters Basilica
Section 40: 10 Low Poly buildings in Blender
Lecture 323 Lighthouse of Alexandria
Lecture 324 Mausoleum of Halicarnassus
Lecture 325 Temple of Artemis
Lecture 326 Colossus of Rhodes (Part 1)
Lecture 327 Colossus of Rhodes (Part 2)
Lecture 328 Colossus of Rhodes (Part 3)
Lecture 329 Statue of Zeus (Part 1)
Lecture 330 Statue of Zeus (Part 2)
Lecture 331 Statue of Zeus (Part 3)
Lecture 332 Taj Mahal
Lecture 333 Brooklyn Bridge
Lecture 334 Flatiron Building
Lecture 335 Las Vegas Hotel
Lecture 336 Chrysler Building
Lecture 337 Project Files - Mammoth Interactive
Section 41: Modelling 14 Low Poly Buildings for Games!
Lecture 338 Sear Tower
Lecture 339 Golden Gate Bridge
Lecture 340 Project Files - Golden Gate Bridge
Lecture 341 GM Renaissance Center
Lecture 342 Project Files - GM Renaissance Center
Lecture 343 Guggenheim Museum
Lecture 344 Project Files - Guggenheim Museum
Lecture 345 Moai Easter Island Statue
Lecture 346 Project Files - Moai Easter Island Statue
Lecture 347 Stonehenge Aoteara
Lecture 348 Project Files - Stonehenge Aoteara
Lecture 349 Brandenburg Gate
Lecture 350 Project Files - Brandenburg Gate
Lecture 351 Great Sphinx of Giza
Lecture 352 Project Files - Great Sphinx of Giza
Lecture 353 Temple of Philae
Lecture 354 Project Files - Temple of Philae
Lecture 355 Christ the Redeemer
Lecture 356 Project Files - Christ the Redeemer
Lecture 357 Temple of Heaven
Lecture 358 Project Files - Temple of Heaven
Lecture 359 Petronas Twin Towers
Lecture 360 Project Files - Petronas Twin Towers
Lecture 361 Star Shape Fort
Lecture 362 Project Files - Star Shape Fort
Lecture 363 The Royal Ontario Museum
Lecture 364 Project Files - The Royal Ontario Museum
Section 42: Build 3D Models of Trees in Blender
Lecture 365 Tree Assets
Lecture 366 Pine Tree Assets
Lecture 367 Palm Trees Assets
Section 43: Build Desert Models in Blender
Lecture 368 Rock Assets
Lecture 369 Dead Tree Assets
Lecture 370 Cactus Trees
Lecture 371 Island Region
Lecture 372 Mountain Region
Lecture 373 Desert Region and Plateau
Section 44: 3D Modeling in Unity
Lecture 374 Snow Mountain Region
Lecture 375 Unity Mountain Region
Lecture 376 Unity Island Environment
Lecture 377 Unity Snow Mountain Region
Lecture 378 Boombox Asset
Section 45: Source Files - 3D Modeling Environments
Lecture 379 Source Files - 3D Environment Models
Section 46: Low Poly Rock Models for 3D environments
Lecture 380 Low Poly Smooth Stones
Lecture 381 Low Poly Stone Slabs
Lecture 382 Snow on Rocks
Lecture 383 Jagged Rock Slab
Lecture 384 Desert Floor
Lecture 385 Jagged Rocks and Desert Floor
Lecture 386 Blender Source Files
Section 47: Low Poly Sword as weapons
Lecture 387 Claymore
Lecture 388 Dagger
Lecture 389 Greek Sword
Lecture 390 Katana
Lecture 391 Simple Blade
Lecture 392 Source Files
Section 48: Low Poly Trees for Games
Lecture 393 Simple Poly Tree
Lecture 394 Fir Tree
Lecture 395 Christmas Tree with a star
Lecture 396 Willow Tree
Lecture 397 Jungle Tree
Lecture 398 Pine Tree
Lecture 399 Bonsai Tree
Lecture 400 Source Files of Art
Lecture 401 Please rate this course
Lecture 402 Bonus Lecture - Mammoth Interactive Deals
No prior coding skills necessary.,Anyone who wants their start at making 3D or 2D video games.,Beginners who want to learn how to use Blender.,If you want to, you can download the models in the project files and import into Unity.
Homepage