• Regeln für den Video-Bereich:

    In den Börsenbereich gehören nur Angebote die bereits den Allgemeinen Regeln entsprechen.

    Einteilung

    - Folgende Formate gehören in die angegeben Bereiche:
    - Filme: Encodierte Filme von BluRay, DVD, R5, TV, Screener sowie Telesyncs im Format DivX, XviD und x264.
    - DVD: Filme im Format DVD5, DVD9 und HD2DVD.
    - HD: Encodierte Filme mit der Auflösung 720p oder darüber von BluRay, DVD, R5, TV, Screener sowie Telesyncs im Format x264.
    - 3D: Encodierte Filme von BluRay, die in einem 3D Format vorliegen. Dies gilt auch für Dokus, Animation usw.
    - Serien: Cartoon/Zeichentrick, Anime, Tutorials, Dokumentationen, Konzerte/Musik, Sonstiges sind demnach in die entsprechenden Bereiche einzuordnen, auch wenn sie beispielsweise im High Definition-Format oder als DVD5/DVD9/HD2DVD vorliegen. Ausnahme 3D.
    - Bereich Englisch: Englische Releases gehören immer in diesen Bereich.
    - Bereich Talk: Der Bereich, in dem über die Releases diskutiert werden kann, darf, soll und erwünscht ist.


    Angebot/Beitrag erstellen

    - Ein Beitrag darf erst dann erstellt werden, wenn der Upload bei mindestens einem OCH komplett ist. Platzhalter sind untersagt.
    - Bei einem Scenerelease hat der Threadtitel ausschließlich aus dem originalen, unveränderten Releasenamen zu bestehen. Es dürfen keine Veränderungen wie z.B. Sterne, kleine Buchstaben o.ä. vorgenommen werden. Ausnahme Serienbörse:
    - Bei einem Sammelthread für eine Staffel entfällt aus dem Releasename natürlich der Name der Folge. Beispiel: Die Simpsons S21 German DVDRip XviD - ITG
    - Dementsprechend sind also u.a. verboten: Erweiterungen wie "Tipp", "empfehlenswert", "only", "reup", usw. / jegliche andere Zusatzinformation oder Ergänzung, welche nicht in obiger Beschreibung zu finden ist.

    Aufbau des Angebots und Threadtitel

    Der Titel nach folgendem Muster erstellt zu werden. <Name> [3D] [Staffel] [German] <Jahr> <Tonspur> [DL] [Auflösung] <Quelle> <Codec> - <Group>
    Beispiel: The Dark Knight German 2008 AC3 DVDRip XviD - iND
    Beispiel: The Dark Knight 2008 DTS DL BDRip x264 - iND
    Beispiel: The Dark Knight 2008 AC3 DL BDRip XviD - iND
    Beispiel: The Dark Knight German 2008 AC3 720p BluRay x264 iND
    Beispiel: The Dark Knight 2008 DTS DL 1080p BluRay x264 iND
    Beispiel: Die Simpsons S01 German AC3 DVDRip XviD iND
    Beispiel: Die Simpsons S20 German AC3 720p BluRay x264 iND
    Beispiel: Sword Art Online II Ger Sub 2014 AAC 1080p WEBRip x264 - peppermint
    Entsprechend sind also u.a. verboten: Sonderzeichen wie Klammern, Sterne, Ausrufezeichen, Unterstriche, Anführungszeichen / Erweiterungen wie "Tipp", "empfehlenswert", "only", "reup", usw. / jegliche andere Zusatzinformation oder Ergänzung, welche nicht in obiger Beschreibung zu finden ist
    Ausnahmen hiervon können in den Bereichen geregelt sein.

    Die Beiträge sollen wie folgt aufgebaut werden:
    Überschrift entspricht dem Threadtitel
    Cover
    kurze Inhaltsbeschreibung
    Format, Größe, Dauer sind gut lesbar für Downloader außerhalb des Spoilers zu vermerken
    Nfo sind immer Anzugeben und selbige immer im Spoiler in Textform.
    Sind keine Nfo vorhanden z.B. Eigenpublikationen, sind im Spoiler folgende Dateiinformationen zusätzlich anzugeben :
    Quelle
    Video (Auflösung und Bitrate)
    Ton (Sprache, Format und Bitrate der einzelnen Spuren)
    Untertitel (sofern vorhanden)
    Hosterangabe in Textform außerhalb eines Spoiler mit allen enthaltenen Hostern.
    Bei SD kann auf diese zusätzlichen Dateiinformationen verzichtet werden.

    Alle benötigten Passwörter sind, sofern vorhanden, in Textform im Angebot anzugeben.
    Spoiler im Spoiler mit Kommentaren :"Schon Bedankt?" sind unerwünscht.


    Releases

    - Sind Retail-Release verfügbar, sind alle anderen Variationen untersagt. Ausnahmen: Alle deutschen Retail-Release sind CUT, in diesem Fall sind dubbed UNCUT-Release zulässig.
    - Im Serien-Bereich gilt speziell: Wenn ein Retail vor Abschluss einer laufenden Staffel erscheint, darf diese Staffel noch zu Ende gebracht werden.62
    - Gleiche Releases sind unbedingt zusammenzufassen. Das bedeutet, es ist zwingend erforderlich, vor dem Erstellen eines Themas per Suchfunktion zu überprüfen, ob bereits ein Beitrag mit demselben Release besteht. Ist dies der Fall, ist der bereits vorhandene Beitrag zu verwenden.
    - P2P und Scene Releases dürfen nicht verändert oder gar unter einem iND Tag eingestellt werden.


    Support, Diskussionen und Suche

    - Supportanfragen sind entweder per PN oder im Bereich Talk zu stellen.
    - Diskussionen und Bewertungen sind im Talk Bereich zu führen. Fragen an die Uploader haben ausschließlich via PN zu erfolgen, und sind in den Angeboten untersagt.
    - Anfragen zu Upload-Wünschen sind nur im Bereich Suche Video erlaubt. Antworten dürfen nur auf Angebote von MyBoerse.bz verlinkt werden.


    Verbote

    - Untersagt sind mehrere Formate in einem einzigen Angebotsthread, wie beispielsweise das gleichzeitige Anbieten von DivX/XviD, 720p und 1080p in einem Thread. Pro Format, Release und Auflösung ist ein eigener Thread zu eröffnen.
    - Grundsätzlich ebenso verboten sind Dupes. Uploader haben sich an geeigneter Stelle darüber zu informieren, ob es sich bei einem Release um ein Dupe handelt.
    - Gefakte, nur teilweise lauffähige oder unvollständige Angebote sind untersagt. Dies gilt auch für eigene Publikationen, die augenscheinlich nicht selbst von z.B. einer DVD gerippt wurden. Laufende Serien, bei denen noch nicht alle Folgen verfügbar sind, dürfen erstellt und regelmäßig geupdatet werden.
    - Untersagt sind Angebote, welche nur und ausschließlich in einer anderen Sprache als deutsch oder englisch vorliegen. Ausnahmen sind VORHER mit den Moderatoren zu klären.


    Verstoß gegen die Regeln

    - Angebote oder Beiträge, die gegen die Forenregeln verstoßen, sind über den "Melden"-Button im Beitrag zu melden.
  • Bitte registriere dich zunächst um Beiträge zu verfassen und externe Links aufzurufen.


Englische Tutorials

99e55c18-580f-4a7f-b526-2cdede114075.png

ACRYLIC PAINTING: FLORAL BOUQUET - Beginner to Intermediate
Duration: 39m | Video: .MP4, 1280x720, 30 fps | Audio: AAC, 48 kHz, 2ch | Size: 471 MB
Genre: eLearning | Language: English​

Welcome to Acrylic Painting - Floral Bouquet!
Hi! I'm Michelle Perkett @michelle_perkett
I'm a teacher, mixed media artist, art journaler and floral painter. I create colorful and whimsical Inspirational Art. Over the years my art has been licensed, featured in magazines and shown at major gift shows but my favorite thing is teaching!
What you'll learn in this class
1. How to transfer your downloadable 5 x 7 image using graphite paper onto your journal page
2. How to paint your own colorful floral bouquet in acrylics from start to finish using my fun and easy layering techniques
3. How to add layers of colors to create depth and interest in your painting
4. How to hand letter and paint your favorite word to tie your floral painting all together
What you'll be creating
1. You will be creating your own floral bouquet in acrylic paint using the 5 x 7 PDF image available to download in the "PROJECTS AND RESOURCES" section using techniques from this classs.
This class is great for beginners who are just discovering acrylics and is also perfect for more intermediate painters as well.
Homepage
Screenshots


adba31bf46b6fe6f6f2d7c1ae736ee95.png

Amazing Affinity Designer on the iPad Course - Intermediate / Advanced
Duration: 3h 10m | Video: .MP4, 1280x720, 30 fps | Audio: AAC, 48 kHz, 2ch | Size: 1.72 GB
Genre: eLearning | Language: English​

Hi - I'm Tim
I'm a senior trainer, and designer at Red Rocket Studio,*and a university lecturer working in and around London.
Welcome to my*Amazing Affinity Designer on the iPad Course*- Intermediate / Advanced
Affinity Designer*is one of the best design pieces of software around and a strong (and more affordable) contender for Adobe Illustrator and the iPad version enables you to be more mobile.
It allows you to create*beautiful logos, infographics, patterns,*icons and other digital vector work with stunning color. This modern vector graphic creation software package works primarily in vector form but also allows for a pixel function including working with photographic images and pixel brushes to add gorgeous textures to your artwork.
It has an easy-to-use interface to help you work in a fast and intuitive way.
The course includes the following
How to work with text and create professional looking type as well as understanding the common typographic terminology.
How to create infographics, logos and icons
Learn how to create eye-catching and amazing digital vector artwork
Understand color including RGB / CMYK, Spot as well as working with Gradients
How to create designs for use in print, packaging, advertising, social media, websites and mobile graphics
Work with multiple artboards for professional results.
Work with bitmap brushes and masks
Learn to design UX layouts for mobile devices
Affinity Designer has everything you need to create the perfect vector graphics - whether it's for commercial printing, home printing, web or social media projects.
Music courtesy of Bensound.
Homepage
Screenshots


e72ea36e-727d-4b61-a9b8-3890cf937b63.png

Angular | Build Flights Information System
Published 05/2022
MP4 | Video: h264, 1280x720 | Audio: AAC, 44.1 KHz, 2 Ch
Genre: eLearning | Language: English + srt | Duration: 25 lectures (2h 16m) | Size: 1.05 GB


Build Flights Information System Using Angular
What you'll learn
create a complete website using Angular
create components,directives & services
create a login form & form validation
display data to html using
fix bugs & manage your complete website easily
Requirements
basic understanding of Javascript
basic knowledge of object oriented programming
basic understanding of TypeScript
Description
In this course you will learn how to Build Flights Information System using Angular.
Angular is one of the most popular frameworks for creating front end apps. Its popularity was derived from Google which has created & launched it. If you want to work & move forward with your career as a frond-end developer, you definitely need to learn Angular.
With TypeScript, Angular might seem so difficult and impossible to learn, however, In this course we make things so easy like never before. Actually you will realize how easy Angular is after you follow through with me.
Angular 4 will make the process of managing your website as easy as possible and you will not believe so. Moreover, fixing bugs in Angular is quite simple because you can locate the error quickly with features given by Angular.
By the end of this course you
will have created a completed website.
will have learned the most important features of Angular
will be able to use Angular with your own project
will fix bugs & manage your project easily
Here are the most important topics covered in this course
Creating components
Using directives & creating custom directives
Adding modules to your project
Using command line to interact with your Angular project
MVVM concept
Login form & form validation
Logout & back button
HTTP get request
Get JSON response from HTTP Request
Displaying JSON data to your view
Using for directive loop through arrays in view
Using if statement in view
Adding routing & navigation
Creating services to use throughout your project
Designing your html using bootstrap & css
easiness is our goal, instead of doing it the hard way we choose the easy way in all aspect of our course.
Who this course is for
Web developers (All levels)
Homepage


2ad96efc-ad23-4965-8fd5-403da620d72d.png

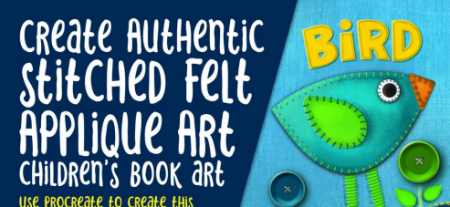
Authentic Stitched Felt Applique Art in Procreate With 10 Brushes Included
Instructors: Delores Naskrent
Duration: 1h 1m • 8 Lessons
Video: MP4 1280x720 44 KHz | English
Level: Beginner | Size: 779 MB​

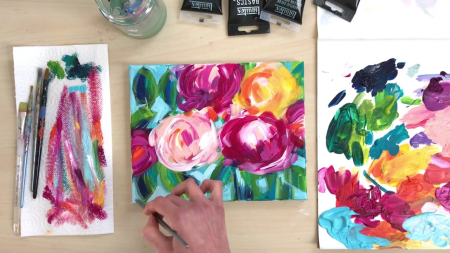
I am always looking for ideas for new classes and brush sets, and this week I was inspired by felt applique art I saw in a children's book. When you look closely and break it down, it translates well for a Procreate project. Why? There are many great concepts to explore: the use of texture, the use of dimension, details that can be reproduced as a brush and much more. I practised a few and felt ready to put this class, Authentic Stitched Felt Applique Art in Procreate, together.
In this class I'll walk you through
my step-by-step method for making brushes
tips for creating compositions using brushes and textures
my workflow for use of layers and other great features like clipping masks
drawing shapes and using draw assist
hand drawing funky lettering
methods for keeping the art fully editable for later adjustments and recoloring
If you have a good basic knowledge of Procreate, you'll be able to go through all the steps, all the while learning or reinforcing this list of skills. This class is for anyone who wishes to up-level their skills and learn methods to improve efficiency.
The key concepts I will include
review of my brush alterations and adjustments
a look at using brushes to add depth and texture
my complete methodology for this type of document in Procreate
This is a great class for you, even if you are not sure what you will use the pattern for. I take the time at the end to show you a bunch of mock ups to give you ideas! I even show you how mock ups work. Learning new Procreate workflows is always a plus. I guarantee you will create something appealing, and it's such a cute project, once you understand the basic set-up!
Intro to Authentic Stitched Felt Applique Art in Procreate
This short intro will give you an overview of the class. I will show you my artworks and what you will be creating in class.
Lesson 1: Overview and Document Set Up
In this lesson, we will start by looking at a bunch of inspiration. I will show you the breakdown of my document. You will get an overview of the document set-up and we will create the first layer, the background.
Lesson 2: Creating the Basic Shapes
In this lesson, we will be creating the basic shapes. I show you the basic structure of one of the groups in which we create the shadow and highlights. Then we will make a clipping mask to add the felt texture to all the layers we created. Keeping layers organized and labelled is critical when you will be using 70+ layers!
Lesson 3: Adding in the Initial Stitching
In this lesson, I will explain the settings and sizing of the stitch brushes in relation to the look we are trying to achieve. I will show you some of the key techniques I use and explain every step of the way. I will also show you how to add more dimension to the stitching.
Lesson 4: Adding Lettering to the Layout
We add the lettering in this lesson, so I explain my process for doing that. I explain all the ins and out of adding the stitching. There are a few factors to take into account.
Lesson 5: Flowers, Leaves and Stems
In this lesson, we start getting to the finishing touches of the final artwork. I will be finalizing all the leaves and that will include creating clipping masks and layer organizing. We are one step closer to finalizing our design now. By the end of the lesson only small details remain.
Lesson 6: Brush Making Details and the Mock Up
In this lesson we will review the making a of a brush so you know how you can add to your sewing set. I will also show you how to use a mock up and add some background, either with color or with a resident pattern.
11fc842e.jpg
Lesson 7: Conclusion, Mock Up and Next Steps
We will conclude everything in this lesson. I show you a couple of quick mock-ups with the pattern and we end with a chat about next steps.
Concepts covered
Concepts covered include but are not limited to Procreate layouts, Procreate details with specialty stitch brushes, layering, Procreate brush stamps for button flowers, Procreate canvas settings, Procreate snapping and guides, the Brush Studio in Procreate, adjusting Procreate brushes, sizing of documents and brushes, compositions with brush stamps, adding texture with brushes, procreate brushes for adding other interesting details, workflow best practices, painting best practice, Procreate composites, techniques with paints and blending, mock ups, and much more.
You will get .
49 minutes of direction from an instructor who has been in graphic design business and education for over 40 years
knowledge of multiple ways to solve each design challenge
an outline with links to further research
a list of helpful online sites to further your education into surface pattern design
Screenshots


4e8d62a10a53ea28fc5b43e76de2781c.jpg

Become a Web Developer from Scratch
Last Updated 03/2022
MP4 | Video: h264, 1280x720 | Audio: AAC, 44.1 KHz, 2 Ch
Genre: eLearning | Language: English + srt | Duration: 190 lectures (26h 41m) | Size: 6.7 GB


This course covers all you need to know about becoming a top skilled web developer even if you never programmed before!
What you'll learn
"The Complete Freelancer Guide" e-Book
Certificate of Completion
30 Free Responsive Templates
Awesome Portfolio Website
Make REAL life web apps with our final projects
Coding Exercises and Challenges
PDF Manuals and Guides
Career Advice From Experts
24h Support
Course Updated w/ Latest Techs
Massive Q&A Community
All Lectures and Projects Source Codes
Improvement Suggestions for Course
110+ functional forms package
Learn to get free hosting forever
Requirements
Internet, Windows/MAC/Linux
Be prepared for an awesome course!
Description
IMPORTANT NOTE: this course is not up to date and is currently under a complete full update for 2019.
"Become a Web Developer from Scratch" is probably one of the most complete and comprehensive online courses you will ever get to see covering web development from top to bottom. In more than 30 hours of content, this course will cover all you need to know about how to become a top skilled web developer even if you never programmed before. In this course we will be covering the following subjects
FrontEnd Development: JavaScript, jQuery, HTML5, CSS3, Bootstrap
BackEnd Development: PHP, MySQL (MySQLi)
This course will give you all the insights on how the Internet works and after you've completed the course, you will have the breadth of knowledge to be able to create your own websites and apps with the latest technology.
Note: This course is regularly updated with new lectures, guides and projects.
What does this course offer that others don't?
1) Learn how to get free hosting forever
We will provide a lecture that teaches you how to get a free hosting account to upload your projects and show them to your friends and clients.
2) A beautiful portfolio website that you can use as your own
We will help you create your first portfolio website that you will be able to use as your own and present it to your clients as a professional freelancer.
3) Professional career complete guidance for the 2016 tech market
A whole section dedicated on how to start your professional career either as a freelancer or a full-time employee with advice from top experts.
4) The Complete Freelancer E-Book
Download the "Complete Freelancer Guide" E-Book for free.
5) Updated content for 2016
All the content of this course has been recorded and updated for the 2016 tech market.
6) 30 beautiful HTML5 responsive templates
Download 30 amazing HTML5 responsive templates for your web projects.
7) 110+ functional forms package
Create any kind of form (classic, multistep, pop up menu, pop up bottom, modal, without footer and header) with client side and server side validation.
Note: All the previous offers will be immediately provided to the student after purchasing the course.
Who this course is for
Programmers or non-programmers.
Aspiring Developers.
Entrepeneurs.
No age limit.
Students.
Homepage


e0a1d4d7-e773-47d3-be1f-47da7d93eba6.png

Bee Ecology: a Simple Guide for Bee Caring in your Backyard
Video: .mp4 (1280x720, 30 fps(r)) | Audio: aac, 44100 Hz, 2ch | Size: 2.34 GB
Genre: eLearning Video | Duration: 18 lectures (2 hour, 6 mins) | Language: English


Learn about the amazing diversity of bees: from solitary bees to honeybees. An essential guide for bee conservation
What you'll learn
Bees diversity
Bee conservation in your backyard
Pollination: a love story
Bee gardening and do it yourself projects
Requirements
No
Description
Do you know how many species of bees there are in the world? Have you ever thought about that?
Together we'll discover the diversity of bees, their evolution, how they see the world, their intimate relationship with flowers, their important role in pollination, their different way of life, from solitary bees to eusocial.
We´ll go for a bee safari, make seed bombs, plan a bee garden, and build a bee hotel together. You'll learn other actions you can take to save the bees.
Come and join me, I'm really looking forward to share with you the extraordinary and diverse world of bees.
Who this course is for
Beekeepers, bee lovers
Ecologists, naturalists
Gardeners, flower lovers
Screenshots


b96fc1188b7fb91685e39e2c3955468d.png

Build your First Website Using Webflow : Figma to Development (No Coding)
Duration: 1h 53m | Video: .MP4, 1280x720, 30 fps | Audio: AAC, 48 kHz, 2ch | Size: 0.98 GB
Genre: eLearning | Language: English​

Hi guys, in this class you will be learning about possibly one of the best No-Code website building platform Webflow. Webflow lets you create professional websites with minimal effort, no coding and provides total control over all aspects of the website.*In the class we'll*go through all the essential features and how it's to be*used*by building a website entirely from scratch and during*the journey we'll learn about
Project creation
Designing page structure
Adding and*aligning elements
Padding and Margin
Grids
Effective naming convention
Animations
Making website responsive for all screen sizes
Final Product
Homepage
Screenshots


b4184ba43acb408d35a8811276c5b767.jpg

Cooking Like a Chef: 5 Fundamental Skills for Kitchen Success
Duration: 51m | Video: .MP4, 1280x720, 30 fps | Audio: AAC, 48 kHz, 2ch | Size: 687 MB
Genre: eLearning | Language: English​

Unlock your arsenal of kitchen skills and become a better cook with Alexis Gabriel Ainouz (aka Alex French Guy).
Knowing how to cook is a superpower! Go into the kitchen with Alex and discover the essential skills for excellent home cooking. Alex, an avowed food geek, consolidates lessons from ten years in the kitchen into five fundamental skills every burgeoning home chef can use. In the kitchen with Alex, you'll learn practical techniques for delicious, reliable cooking. There is nothing superfluous here.
In Alex's kitchen you'll learn
Space preparation to ensure you have what you need and nothing more
Ingredient selection so you can always improvise a delicious meal
Knife skills for safe and efficient chopping, slicing, and dicing
The never-ending meal philosophy so leftovers never go to waste
Plus, Alex combines the skills you've learned in class and creates a beautiful omelet, and prepares a simple and delicious steak with sauce.
This class is for anyone who eats! Whether you're a seasoned home chef or just picking up a skillet for the first time, you'll walk away with a refreshed perspective and a solid understanding of how to make your time in the kitchen more fun and delicious.
If you struggle to get consistent results in the kitchen and wish every meal was a little more delicious, this class is for you. But even if you've never touched a chef's knife or saucepan, you'll be able to keep up. Alex will review the tools and ingredients he recommends but you don't need anything to get started.
Homepage
Screenshots


e931b47c-dfa0-43f5-a5ad-756615682668.png

Create Realistic Looking Mountains in Blender
Duration: 2h 30m | Video: .MP4, 1280x720, 30 fps | Audio: AAC, 48 kHz, 2ch | Size: 1.39 GB
Genre: eLearning | Language: English​

In this course, you will learn how to create a fully procedural mountain formation in Blender, just by using nodes. Not only that but you will learn a lot of useful techniques and tips all the way, that will take your 3D*skills to the next level.
Here's a brief summary of all the different videos inside the course
Video 1: Studying References:*In this video, you will learn the basics of how to study some real-life references that will guide us through the process of creating a believable mountain.
Videos: 2/3/4/5/6/7: Creating The Mountain: In these videos, we will heavily focus on creating the basic mesh for our mountain, using the power of displacement in Blender. By the end of this part, you will have a solid understanding of how you can build complex objects just by using displacement nodes.
Videos 8/9/10/11/12: Shading The Mountain: In these videos, you will learn how to create the material for the mountain. That includes the Rocks and the Snow, and we will create all of them procedurally so that by the end of this part, you will be able to create some really cool materials for your environments.
Videos: 13/15: Baking: In these videos, you will learn how to bake the displacement map, and more importantly how to use it later to fill out the background, or maybe use it in other 3D software.
Video 14: Camera Animation:*In this video, you will learn how to create a cool cinematic camera movement easily in Blender
Videos: 16/17: World Lighting: In these videos, you will learn how to combine the power of the sky texture that Blender comes with, with some real-life skies to get the best of both worlds
Video 18: Adding Clouds: In this video, you will learn how how to add some clouds swimming between the mountains.
Videos 19/20/21/22: Rendering Settings: In these videos, you will learn how to render your scene and this includes how to optimize your render settings for best performance, along with how to break down your scene into different layers, which will allow you, later on, to do some compositing work.
Video 23: Mist Pass: In this video, you will learn how to render a mist pass that we will use later to add more atmospheric depth to the scene.
Videos 24/25: Compositing: In these videos, you will learn how to composite your shot and add the final adjustments in Blender.
Final Render
Homepage
Screenshots


f01dccd7-1627-4e37-a30a-ea3a565d1d94.png

Creating Abstract Art In Cinema 4D and Photoshop - Cryptic
Instructors: Reimagine Fx
Duration: 44m • 7 Lessons
Video: MP4 1280x720 44 KHz | English
Level: Beginner | Size: 388 MB​

In this lesson, we're going to learn how to create abstract art in cinema 4d without using any third-party plugin. The lessons are very basic and easy to learn, anybody whos a beginner in Cinema 4D can learn it. I hope you enjoy this class.
Screenshots


43e37646-66b5-4d53-b849-1e61a5554b9d.png

Drawing with Markers: Learn How to Sketch Expressive Fruits & Berries
Duration: 2h 48m | Video: .MP4, 1280x720, 30 fps | Audio: AAC, 48 kHz, 2ch | Size: 1.75 GB
Genre: eLearning | Language: English​

Do you want to learn how to draw vivid and mouth-watering fruit illustrations?*This class is a step-by-step tutorial for drawing five colorful fruits and berries with alcohol-based markers.
It's*excellent for those who have some experience with alcohol-based markers. However,*it is not a suitable class for zero beginners.*If you are just getting started with markers, please go to my class "Markers 101: The Basics and Step-by-Step Sketching" to learn about the supplies and basic techniques.
What does this class include?
First, I will take you through the tools and materials necessary for this class and give you some general advice on markers. At the beginning of every video, I will also show you the marker colors I will use for the particular drawing. Don't worry if you don't have the same colors or brand! You can use any alcohol-based markers for this class and color your fruits and berries whatever colors you want.
We will start with the easiest drawing - the kiwi fruit. I will show you how to make a pencil sketch and refine it with a fineliner, and I will take you through the step-by-step process of coloring it with markers. In the following videos, we will draw a branch with oranges, blueberries, and cherries, and we will finish with a colorful strawberry branch.
In each part, you will not only draw different fruits or berries but also learn something new about marker sketching techniques and drawing in general, and you will develop your personal sketching style along the way. By the end of this class, you will have much more confidence in creating colorful marker sketches.
♥ Looking forward to seeing your fantastic drawings in the Project Gallery! ♥
Enjoy and have fun!
Homepage
Screenshots


eef864f8-0563-4af0-8464-f0bcc0bb52ae.png

EVE-NG - How To Build Cyber Security and Networking Labs
Published 05/2022
MP4 | Video: h264, 1280x720 | Audio: AAC, 44.1 KHz, 2 Ch
Genre: eLearning | Language: English + srt | Duration: 22 lectures (3h 7m) | Size: 1.83 GB


Learn how to build Enterprise Grade Labs on your Laptop
What you'll learn
The quick and painless process to setting up EVE-NG
How to finally understand EVE-NG networking and VMWare Workstation Pro
How to upload appliance images into EVE-NG
How to break free from imposter syndrome by building real labs and getting hands-on skills!
Requirements
Laptop with at least 8GB RAM
40GB HDD minimum
Intel i5 or i7 CPU
Internet Connection
Description
I know the feeling.
You get hired into a position that's a little bit out of your league... and every day feels like a panic.
You can feel the acid churning in your stomach.
You can feel your mouth getting dry, palms getting sweaty and heart starting to race.
It's called imposter syndrome and I've been there! I still remember the first day I was hired on as a Senior Penetration Tester at a large consulting firm in the Washington D.C area. I was the lead but I basically got the job on a few YouTube videos, inside connections and a killer resume.
Yeah, I had some experience but not the kind required for the role - and man I seriously felt like one day my boss, my colleagues, my wife - everyone would find out I was a poser.
I honestly had no idea what I was doing so everyday was acting day.
Well guess what???
I'm NOT going to let this happen to you.
I couldn't sleep for weeks! And trust me I'm a pretty good sleeper but after landing the job I was terrified.
I honestly wish I had a course like this when I was just getting into cyber security, information technology and studying for my CCNA, CCNP and Network+ certifications.
The purpose of this course is focused and simple
By the end of the course you will know how to build a enterprise grade network lab with REAL networking gear inside a virtual environment you can take with you anywhere on your laptop.
Yes, you'll need a beefy laptop (mine has 32GB of RAM but 16GB will work). But even if you don't have the hardware specs this course is a great "just incase" course to have in your library because I'm giving you everything you need to build complex lab scenarios. Everything is one place. I haven't held back anything.
You're getting step-by-step video walkthroughs from an expert with over 15 years of experience in Information Technology, Virtualization and Cyber Security.
If you've ever wanted an environment to play, experiment, learn and train - without those annoying cloud costs and complexity - you are in the right place.
This course is for you.
Move over GNS3 - EVE-NG is in charge!
See you inside :)
Who this course is for
Anyone who always feels intimidated by EVE-NG thinking there is a lot of setup.
Anyone studying for the Cisco CCNA, Cisco CCNP, CompTIA Network+ or CompTIA Security+ exams.
Anyone who has tried to use GNS3 to build home networking labs and is looking for something better
Homepage


Zurück
Oben Unten