


Free Download Creating A Medieval Town Environment - Using Ue5 & Blender
Published 4/2024
MP4 | Video: h264, 1920x1080 | Audio: AAC, 44.1 KHz
Language: English | Size: 48.32 GB | Duration: 33h 15m
Learn how a professional environment artist works when creating environments for games.
What you'll learn
learn how to create entire 3d environments
Learn how to create both unique and procedural textures
Learn how to do lighting and post effects
Learn how to use modular design
Learn how to use Unreal Engine 5 Nanite
Requirements
This course expects that you know the basics of the programs mentioned in details
Description
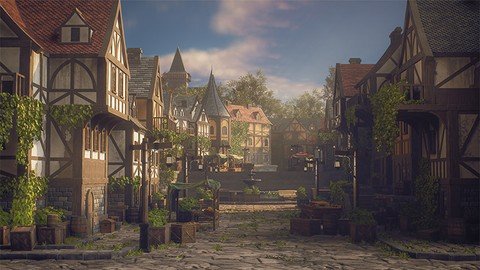
Creating a Medieval Town Environment - Using UE5 & BlenderLearn how a professional environment artist works when creating environments for games. In this case, a medieval-style town environment using Blender & Unreal Engine 5, along with the help of nanite, Lumen, Zbrush, and various other software like substance designer & painter.Based on the amazing concept art of Vincent LauBLENDER, SUBSTANCE, ZBRUSH, AND UNREAL ENGINE 5This course will cover a very large number of topics, but the biggest topics are as follows
 oing project planning and creating proper blockout scenes.Creating modular buildings with high reusability.Sculpting wood and concrete assets in Zbrush.Using Nanite in UE5 along with slightly modified traditional workflows for higher quality models while still being able to use and modify them in other 3d software.Creating various tillable materials using substance 3d designer.Creating unique textures using Substance Painter.Doing lighting and post effects in unreal engine 5.Adding actual geometry displacement on our modular assets using the modeling tools in Unreal.Doing general level art in Unreal Engine.And so much more.The general takeaway of this course is that in the end, you will have the knowledge of how to create exactly what you see in the images, and you can apply this knowledge to almost any type of environment.29+ HOURS!This course contains over 29+ hours of content - You can follow along with every single step - This course has been done 100% in real-time except for a few time-lapses for very repetitive tasks.This course has been divided up into easy-to-understand chapters. We will start the course off by planning our environment and creating our blockout assets.We will then already Design the entire level in UE5.After this, we will first create all of our tillable materials using Substance 3D Designer.Then we will focus on taking our assets to final. In these stages, you will learn everything from modeling in blender, sculpting in Zbrush, uv-unwrapping in RizomUV, and texturing in Substance 3D Painter.We will then focus on getting all of our final models and textures in Unreal Engine and implanting them in our scene.After this is done, we will start focusing on doing our first lighting pass, creating some additional assets, and taking our scene closer to final.Finally, we will finish up by creating some simple foliage, polishing up our scene and adding some external 3d assets, taking some final , and then this environment is completed.SKILL LEVELThis game art tutorial is perfect for students who have familiarity with 3d Modeling tools and Unreal Engine - Everything in this tutorial will be explained in detail. However, if you have never touched any modeling, texturing, or engine tools before, we recommend that you first watch an introduction tutorial on those programs (you can find many of these for free on YouTube or paid on this very website)TOOLS USEDUnreal Engine 5BlenderSpeedTreeRizomUVMarmoset Toolbag 4Substance DesignerSubstance PainterZbrushPlease note that most techniques used are universal, so they can be replicated in almost any 3D software like Maya & 3DS Max.YOUR INSTRUCTOREmiel Sleegers is a lead environment artist and owner of FastTrack Tutorials. He's worked on games like The Division 2 + DLC at Ubisoft, Forza Horizon 3 at Playground Games, and as a Freelancer on multiple projects as an Environment Artist and Material Artist.
Overview
Section 1: Main Course
Lecture 1 Going Over Our Reference And Planning
Lecture 2 Setting Up Our Scenes And Start Creating Our Blockout Pieces
Lecture 3 Creating Our Blockout Part2
Lecture 4 Creating Our Blockout Part3
Lecture 5 Creating Our Blockout Part4
Lecture 6 Creating Our Blockout Part5
Lecture 7 Creating Our Blockout Part6
Lecture 8 Creating Our Blockout Part7
Lecture 9 Creating Our Blockout Part8
Lecture 10 Designing Our Buildings Part1
Lecture 11 Designing Our Buildings Part2 -Timelapse
Lecture 12 Designing Our Buildings Part3 -Timelapse
Lecture 13 Designing Our Buildings Part4 -Timelapse
Lecture 14 Discussing Our Progress So Far
Lecture 15 Designing Our Buildings Part5 -Timelapse
Lecture 16 Creating Our Round Roof
Lecture 17 Designing Our Buildings Part6 -Timelapse
Lecture 18 Creating And Placing Our Prop Blockouts -Timelapse
Lecture 19 Creating Our Wood Material Part1
Lecture 20 Creating Our Wood Material Part2
Lecture 21 Creating Our Pavement Material Part1
Lecture 22 Creating Our Pavement Material Part2
Lecture 23 Creating Our Pavement Material Part3
Lecture 24 Creating Our Pavement Material Part4
Lecture 25 Creating Our Pavement Material Part5
Lecture 26 Creating Our Pavement Material Part6
Lecture 27 Creating Our Pavement Material Part7
Lecture 28 Creating Our Brick Wall Material Part1
Lecture 29 Creating Our Brick Wall Material Part2
Lecture 30 Creating Our Brick Wall Material Part3
Lecture 31 Creating Our Slate Roof Texture Part1
Lecture 32 Creating Our Slate Roof Texture Part2
Lecture 33 Creating Our Plaster Material Part1
Lecture 34 Creating Our Plaster Material Part2
Lecture 35 Selecting Our Wood Pieces And Preparing Them For Sculpting
Lecture 36 Sculpting Our Wood Pieces Part1
Lecture 37 Sculpting Our Wood Pieces Part2
Lecture 38 Sculpting Our Wood Pieces Part3 - Timelapse
Lecture 39 Sculpting Our Wood Pieces Part4 - Timelapse
Lecture 40 Sculpting Our Wood Pieces Part5
Lecture 41 Optimizing Our High Poly And Exporting It
Lecture 42 Creating Our Lowpoly Wood Pieces
Lecture 43 Preparing Our Lowpoly Wood Pieces For Uv Unwrap
Lecture 44 Uv Unwrapping Our Wood Pieces Part1
Lecture 45 Uv Unwrapping Our Wood Pieces Part2 - Timelapse
Lecture 46 Uv Unwrapping Our Wood Pieces Part3
Lecture 47 Baking Our Wood Pieces
Lecture 48 Texturing Our Wood Pieces
Lecture 49 Setting Up Our Final Modular Assets Part1
Lecture 50 Setting Up Our Final Modular Assets Part2
Lecture 51 Setting Up Our Final Modular Assets Part3 - Timelapse
Lecture 52 Setting Up Our Final Modular Assets Part4 - Timelapse
Lecture 53 Creating Our Street Light Part1
Lecture 54 Creating Our Street Light Part2
Lecture 55 Creating Our Street Light Part3
Lecture 56 Creating Our Street Light Part4
Lecture 57 Creating Our Doors And Windows Part1 -Timelapse
Lecture 58 Creating Our Doors And Windows Part2 -Timelapse
Lecture 59 Creating Our Curb Part1
Lecture 60 Creating Our Curb Part2
Lecture 61 Finishing Our Roof Assets
Lecture 62 Placing Our Small Assets -Timelapse
Lecture 63 Doing Our First Lighting Pass And Adding Variation
Lecture 64 Adding More Variation To Our Environment
Lecture 65 Creating And Placing Our Foliage Part1
Lecture 66 Creating And Placing Our Foliage Part2
Lecture 67 Creating And Placing Our Foliage Part3
Lecture 68 Doing Our Second Lighting Pass And Planning The Polishing Phase
Lecture 69 Polishing Our Scene Part1 - Timelapse
Lecture 70 Polishing Our Scene Part2 - Timelapse
Lecture 71 Outro
Section 2: Creating Additional Assets
Lecture 72 Barrel_Creation
Lecture 73 Crate_Creation
Lecture 74 Flower_Pot_Creation
Lecture 75 Fountain_Creation
Lecture 76 Seating_Creation
This course is perfect for intermediate to advanced artists
Homepage
Recommend Download Link Hight Speed | Please Say Thanks Keep Topic Live
No Password - Links are Interchangeable
